Friday, March 13, 2015
Selecting Upload Destinations with the Picker API
Drive is a great drop zone for incoming files -- no matter if they’re coming from cameras, scanners, faxes, or countless other devices or apps. But throwing files into the root folder makes it difficult for users to find and organize their content.
I’ve seen developers create a folder when the user first connects the app with Drive to keep files organized by the app that created it. It’s a simple technique that is easy to implement and good default behavior for most applications.
With the Picker API, we can go a step further and offer users the choice of destinations too. For example, I’d like my scanner to put work files in one folder and personal files in another, or even configure multiple destinations depending on the type of document I’m scanning.
For this particular use case, the picker needs to be configured to show folders and only show folders. That requires customizing the DocsView just a little.
var docsView = new google.picker.DocsView()
  .setIncludeFolders(true)
  .setMimeTypes(application/vnd.google-apps.folder)
  .setSelectFolderEnabled(true);
By enabling folders & the ability to select them while simultaneously filtering out everything else, users can quickly and easily select one of their existing folders as a destination. The rest of the code to show the picker is par for the course.
// Handle user actions with the picker.
var callback = function(data) {
  if (data.action == google.picker.Action.PICKED) {
    var doc = data.docs[0];
    alert("You picked " + doc.id);
  }
};

var picker = new google.picker.PickerBuilder()
  .addView(docsView)
  .setCallback(callback)
  .build();

picker.setVisible(true);
Not only is this easy to implement, it’s safer for users. By offloading this functionality to the Picker API, an app only needs the drive.file scope to write files into the user’s preferred location.
You can learn more about the Picker API at developers.google.com or ask questions at StackOverflow with the google-drive-sdk tag.
 | Steven Bazyl profile | twitter Steve is a Developer Advocate for Google Drive and enjoys helping developers build better apps. |

Thursday, March 12, 2015
Creating More Responsive Applications with Client Handlers and Validators
When it comes to writing UI applications in Apps Script, we get a lot of requests to support event callbacks that are handled in the user’s browser. For example, if your application has a form, you may want to disable a button after it is clicked the first time. Until now, the only way to do that would be by using an event handler on the server to disable that button. Using Client Handlers, your application can now respond to events in the browser without the need to perform a round trip to Google Apps Script servers.
By cutting out the round trip to the server, your app can respond instantly to user input. Imagine, for example, you want to provide your users with instant feedback within your app when a user types text where a number is expected. Ideally, you would want to warn users as they type the value, instead of waiting until the form is submitted. Having a server event handler for each keystroke is definitely overkill for such a simple and common task. Luckily, these use cases are now supported with Apps Script’s new Client Handlers and validators!
Let’s take a look at some code.
Client Handlers
A Client Handler allows you to react to any event in a browser without connecting to the server. What you can do in response to an event is limited to a set of predefined common actions, but you have a lot of flexibility in making your app more responsive.
You can use Client Handlers in any UiApp regardless of whether you are embedding in a Spreadsheet or a Sites Page or publishing as a service. This simple application enables the user to click a button to display the classic “Hello world” message:
function doGet() {
  var app = UiApp.createApplication();
  var button = app.createButton("Say Hello");

  // Create a label with the "Hello World!" text and hide it for now
  var label = app.createLabel("Hello World!").setVisible(false);

  // Create a new handler that does not require the server.
  // We give the handler two actions to perform on different targets.
  // The first action disables the widget that invokes the handler
  // and the second displays the label.
  var handler = app.createClientHandler()
    .forEventSource().setEnabled(false)
    .forTargets(label).setVisible(true);

  // Add our new handler to be invoked when the button is clicked
  button.addClickHandler(handler);

  app.add(button);
  app.add(label);
  return app;
}
The Client Handlers in the above example are set up in two steps:
- Create a Client Handler just as we would create the server handlers you all know and love.
- Define the target widget for this handler. The target widget is the widget on which the handler will take action. We set the handler’s target in one of two ways: (a) By using the
forTargetsmethod to define the target widget. (b) By using theforEventSourcemethod which lets widget wire itself to the client handler.
In the above example, we set the handler’s target to be the event source, so that it will apply to the button that is clicked. Finally, we define the action that the handler should take, in this case disabling the button using setEnabled(false). Aside from setEnabled, you can also change styles using setStyleAttribute, change text using setText, and so on. One Client Handler can perform multiple actions — just chain them together - and you can even change the target so that some actions apply to one set of widgets and some actions to another set. In our example, along with disabling the button, we set the handler to display the label when it is invoked, using setVisible.
Validators
Another new addition to Apps Script is support for validators in handlers. Validators allow handlers to check simple and complex conditions before they are invoked. For example, the following application adds two numbers given by the user, while using validators to make sure the server is only called if both of the text boxes contain numbers.
function doGet() {
  var app = UiApp.createApplication();

  // Create input boxes and button
  var textBoxA = app.createTextBox().setId(textBoxA).setName(textBoxA);
  var textBoxB = app.createTextBox().setId(textBoxB).setName(textBoxB);
  var addButton = app.createButton("Add");

  // Create a handler to call the adding function
  // Two validations are added to this handler so that it will
  // only invoke add if both textBoxA and textBoxB contain
  // numbers
  var handler = app.createServerClickHandler(add)
      .validateNumber(textBoxA)
      .validateNumber(textBoxB)
      .addCallbackElement(textBoxA)
      .addCallbackElement(textBoxB);

  addButton.addClickHandler(handler)

  app.add(textBoxA);
  app.add(textBoxB);
  app.add(addButton);
  return app;
}

function add(e) {
  var app = UiApp.getActiveApplication();
  var result = parseFloat(e.parameter.textBoxA) + parseFloat(e.parameter.textBoxB);
  var newResultLabel = app.createLabel("Result is: " + result);
  app.add(newResultLabel);
  return app;
}
There’s a variety of validators to choose from that perform different tasks. You can verify the input to be a number, an integer, or an e-mail address. You can check for a specific length, or for any numerical value in a defined range. You can also use general regular expressions. Lastly, each validator has its negation.
Note that validators work with both client and server handlers.
Putting it all together
Of course, validators and Client Handlers work best together. For example, in our addition application above, the “Add” button should be disabled as long as the current input is not numeric. We would also like to let the user know why the button is disabled by displaying an error message. To do so, we combine the power of server handlers, Client Handlers, and validators in the following way:
function doGet() {
  var app = UiApp.createApplication();

  // Create input boxes and button.
  var textBoxA = app.createTextBox().setId(textBoxA).setName(textBoxA);
  var textBoxB = app.createTextBox().setId(textBoxB).setName(textBoxB);
  var addButton = app.createButton("Add").setEnabled(false);
  var label = app.createLabel("Please input two numbers");

  // Create a handler to call the adding function.
  // Two validations are added to this handler so that it will
  // only invoke add if both textBoxA and textBoxB contain
  // numbers.
  var handler = app.createServerClickHandler(add)
      .validateNumber(textBoxA)
      .validateNumber(textBoxB)
      .addCallbackElement(textBoxA)
      .addCallbackElement(textBoxB);

  // Create handler to enable the button well all input is legal
  var onValidInput = app.createClientHandler()
      .validateNumber(textBoxA)
      .validateNumber(textBoxB)
      .forTargets(addButton).setEnabled(true)
      .forTargets(label).setVisible(false);

  // Create handler to mark invalid input in textBoxA and disable the button
  var onInvalidInput1 = app.createClientHandler()
      .validateNotNumber(textBoxA)
      .forTargets(addButton).setEnabled(false)
      .forTargets(textBoxA).setStyleAttribute("color", "red")
      .forTargets(label).setVisible(true);

  // Create handler to mark the input in textBoxA as valid
  var onValidInput1 = app.createClientHandler()
      .validateNumber(textBoxA)
      .forTargets(textBoxA).setStyleAttribute("color", "black");

  // Create handler to mark invalid input in textBoxB and disable the button
  var onInvalidInput2 = app.createClientHandler()
      .validateNotNumber(textBoxB)
      .forTargets(addButton).setEnabled(false)
      .forTargets(textBoxB).setStyleAttribute("color", "red")
      .forTargets(label).setVisible(true);

  // Create handler to mark the input in textBoxB as valid
  var onValidInput2 = app.createClientHandler()
      .validateNumber(textBoxB)
      .forTargets(textBoxB).setStyleAttribute("color", "black");

  // Add all the handlers to be called when the user types in the text boxes
  textBoxA.addKeyUpHandler(onInvalidInput1);
  textBoxB.addKeyUpHandler(onInvalidInput2);
  textBoxA.addKeyUpHandler(onValidInput1);
  textBoxB.addKeyUpHandler(onValidInput2);
  textBoxA.addKeyUpHandler(onValidInput);
  textBoxB.addKeyUpHandler(onValidInput);
  addButton.addClickHandler(handler);

  app.add(textBoxA);
  app.add(textBoxB);
  app.add(addButton);
  app.add(label);
  return app;
}

function add(e) {
  var app = UiApp.getActiveApplication();
  var result = parseFloat(e.parameter.textBoxA) + parseFloat(e.parameter.textBoxB);
  var newResultLabel = app.createLabel("Result is: " + result);
  app.add(newResultLabel);
  return app;
}
All of these features can be used to create more advanced and responsive applications. Client handlers can be used to change several attributes for widgets, and validators can help you check a variety of different conditions from well formed email addresses to general regular expressions.
If youd like to chat about these new features or have other questions about Google Apps Script, please join several members of the Apps Script team in the Google Apps Developer Office Hours on Google+ Hangouts tomorrow, Wednesday November 16th at 10am PST. You can also ask questions at any time in the Apps Script forum.
 | Omer Strulovich profile Omer was an intern on the Google Docs team for the summer of 2011. He is now back to pursuing his master’s degree in the field of cryptography. |
Wednesday, March 11, 2015
Exporting native Google documents with the Google Drive SDK
Three months ago, we launched Google Drive along with the Google Drive SDK. The SDK allows applications to manage files that users have uploaded to Drive and to integrate deeply in the Google Drive UI. Today, we’ve just extended the SDK to allow developers to interact with native Google Docs types such as Google Spreadsheets, Presentations, Documents, and Drawings.
We now provide an easy way to export native Google documents through the Google Drive API. We also allow native Google documents to be opened directly from within the Google Drive UI using third-party applications.
If your application is already a Drive-installable app, you can enable this feature by checking the Allow users to open files that can be converted to a format that this app can open option in the Google APIs Console under Drive SDK > Import:

When this feature is enabled, your application will show up under the “Open with” menu in the Google Drive Web UI for the file formats you support. Here’s how it works: if your application supports opening one of the possible export formats for the Google document, users will be able to open that Google document with your application. So for instance, if your application is configured to open PDF files, then because Google Documents are exportable to PDF, users will be able to use your application to open those documents as shown below.
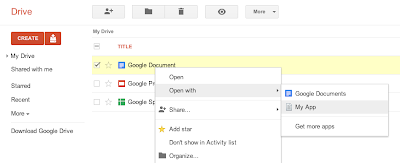
When opening a native Google Document with your application from the Google Drive UI, we will pass the following JSON Object in the state URL parameter of the OAuth 2.0 redirect request that is forwarding the user to your website.
{
  "exportIds": ["file_id"],
  "action":"open"
}
Then you can use the file ID contained in the JSON object to query the Google Drive API and fetch the file’s metadata. Note that the state URL parameter is different when opening regular files as we use the JSON attribute exportIds instead of ids.
Unlike the metadata of regular files which contain a downloadUrl attribute which you can use to download the file’s content, the metadata for native Google documents contains a collection of export URLs. These URLs - one for each supported export format - are listed under the attribute exportLinks, as shown in the HTTP request/response below.
Request:
GET /drive/v2/files/<file_id> HTTP/1.1
Host: www.googleapis.com
Authorization: Bearer <access_token>
Response:
HTTP/1.1 200 OK
Status: 200
...

{
 "kind": "drive#file",
 "id": "<file_id>",
 ...
 "exportLinks": {
  "application/vnd.oasis.opendocument.text": "https://docs.google.com/...",
  "application/msword": "https://docs.google.com/...",
  "text/html": "https://docs.google.com/...",
  "application/rtf": "https://docs.google.com/...",
  "text/plain": "https://docs.google.com/...",
  "application/pdf": "https://docs.google.com/..."
 },
 ...
}
You can query any of these export URLs using an authorized request to download the Google document in your prefered export format.
Below is the full list of supported export formats -- and their associated MIME types -- for the different types of native Google documents:
Google Documents:
- Text File (TXT) - text/plain
- Portable Document Format (PDF) - application/pdf
- OpenDocument Text Document (ODT) - application/vnd.oasis.opendocument.text
- Microsoft Word (DOC) - application/msword
- Hypertext Markup Language (HTML) - text/html
- Rich Text Format File (RTF) - application/rtf
Google Spreadsheets:
- Portable Document Format (PDF) - application/pdf
- Microsoft Excel Spreadsheet (XLS) - application/vnd.ms-excel
- OpenDocument Spreadsheet (ODS) - application/x-vnd.oasis.opendocument.spreadsheet
Google Presentations:
- Text File (TXT) - text/plain
- Portable Document Format (PDF) - application/pdf
- Microsoft Office Open XML Format Presentation (PPTX) - application/vnd.openxmlformats-officedocument.presentationml.presentation
Google Drawings:
- Scalable Vector Graphics (SVG) - image/svg+xml
- JPEG Images (JPEG) - image/jpeg
- Portable Network Graphics (PNG) - image/png
- Portable Document Format (PDF) - application/pdf
Please check out the Google Drive SDK documentation if you’d like to learn more, and feel free to ask any questions you may have on Stack Overflow.
 | Nicolas Garnier profile | twitter | events Nicolas Garnier joined Google’s Developer Relations in 2008 and lives in Zurich. He is a Developer Advocate focusing on Google Apps and Web APIs. Before joining Google, Nicolas worked at Airbus and at the French Space Agency where he built web applications for scientific researchers. |
Enabling Single Sign on with OpenID for the Google Apps Marketplace
We chose to power our Single Sign On (SSO) using OpenID because it’s the predominant open standard for federated identity on the web. The protocol is supported by a large number of OpenID identity providers and many sites around the web accept it. And to make Single Sign On easy to access, Marketplace apps also plug in to both the universal navigation bar inside Gmail, Calendar, Docs, and Sites, as well as the administrative control panel.

<Extension id="navLink" type="link">
  <Name>Amazing Cloud App</Name>
  <Url>http://www.example.com/home.php?domain=${DOMAIN_NAME}</Url>
</Extension>

<Extension id="realm" type="openIdRealm">
  <Url>http://www.example.com</Url>
</Extension>
With this XML in the application manifest, a link called “Amazing Cloud App” will appear in the universal navigation of all Google Apps. Also, if one of the realms specified in the manifest file precisely matches the openid.realm in the OpenID request, then the user will be seamlessly signed into the app after clicking on the link in the universal navigation (without seeing a typical OpenID interstitial allow/deny page).
Of course, you’ll also need code in your application which accepts OpenID logins. In addition to open source libraries, here are a few companies that are making it easier for cloud applications to integrate with the Google Apps Marketplace. Their code provides simple APIs with which developers can integrate, leaving some of the complexities of the OpenID protocol to be implemented by the experts -- no need to hand-roll your own OpenID code.
- JanRain
JanRain’s open source PHP and Ruby OpenID libraries and on-demand RPX solution enabled the implemention of OpenID for many of the companies that launched on the Google Apps Marketplace by writing simple code or web service calls. - Ping Identity
Ping’s PingFederate is an on-premise service that allows SaaS applications to easily accept OpenID and SAML-based logins by integrating with their libraries or using their web server or application server plug-ins. - TriCipher
TriCipher’s myOneLogin Identity Services is an on-demand application that allows developers to accept OpenID, SAML and other federation protocols by writing simple web service calls.
Their are plenty of open source OpenID libraries available for other platforms, such as OpenID4Java (using Step2 code for Google Apps) and DotNetOpenAuth. More information on implementing Single Sign On in Google Apps Marketplace apps can be found on code.google.com.
If you need additional information on building apps for the Google Apps Marketplace, see the Developer’s Overivew on code.google.com.
Get coding fast with Code School and the Google Drive API
Code School has been doing exciting things with learning to program online. This is why we decided to team up with them to create a way for developers to learn to use the Google Drive API, with no setup required. In the Discover Drive course, you can learn at your own pace from your web browser. You’ll spend less time fussing with coding environments and more time writing code.
To find out what the course is all about, go check it out at Code School. Happy coding!
Cross-posted on the Google Developers Blog.
 | Greg Knoke Google+ Greg Knoke is a technical writer in the Google Drive Developer Relations Team. Prior to joining Google, he worked as a scientist developing image and signal processing algorithms. His current interests include new technologies, content management, information architecture, cooking, music, and photography. |
Tuesday, March 10, 2015
Find Unanswered Emails with Apps Script
Editor’s Note: Guest author Alex Moore is the CEO of Baydin, an email productivity company. --Arun NagarajanAs the CEO of an email productivity company, not a day goes by when I don’t learn about a new email pain point. I love solving email problems for our customers, but many of their problems do not lend themselves to a full browser-extension and server solution, like the products we make. Apps Script is perfect for solving some of these problems in a quick, lightweight, customizable way.
The Awaiting Response script is a perfect example of one of these solutions. My friend Matt Galligan, the CEO of Circa, tweeted a few months back that he wanted a way to find all of the messages that he sent that did not receive a reply.
Boomerang, our flagship extension, provides a way to bring a single message back to your attention if it doesn’t get a response. But Boomerang is not designed for this particular issue — to use Boomerang in this way, you’d need to move every message youd ever sent back to your inbox! Instead, it makes more sense to create a label and use Apps Script to apply it to each of these messages.
The Awaiting Response script searches the Sent folder to identify all messages you sent over the previous week. It then checks each thread to determine if someone else replied to your message. If no one has, the script applies the label AwaitingResponse to the message. You can then easily visit that label to see all those messages in a single glance.
var d = new Date();Apps Script provides access to the full power of Gmail search, right from within your script. This snippet uses Javascript’s Date object to construct a Gmail-formatted search query that finds all of the conversations where you’ve sent a message in the last DAYS_TO_SEARCH days. It then loads the results of that search into an array of Thread objects.
d.setDate(d.getDate() - DAYS_TO_SEARCH);
var dateString = d.getFullYe
ar() + "/" + (d.getMonth() + 1) + "/" + d.getDate();
threads = GmailApp.search("in:Sent after:" + dateString);
var userEmailAddress = Session.getEffectiveUser().getEmail();And this part of the script is where the heavy lifting happens. We iterate through each message in the list of search results, applying a regular expression to the From header in the message to extract the sender’s email address. We compare the sender’s address to the script user’s email address. If they don’t match, we know someone else sent the last message in the conversation. So we apply the AwaitingResponse label to the conversation. If the script user sent the last message, we simply move along to the next message.
var EMAIL_REGEX = /[a-zA-Z0-9._-]+@[a-zA-Z0-9.-]+.[a-z.A-Z]+/g;
# if the label already exists, createLabel will return the existing label
var label = GmailApp.createLabel("AwaitingResponse");
var threadsToUpdate = [];
for (var i = 0; i < threads.length; i++)
{
var thread = threads[i];
var lastMessage = thread.getMessages()[thread.getMessageCount()-1];
lastMessageSender = lastMessage.getFrom().match(EMAIL_REGEX)[0];
if (lastMessageSender == userEmailAddress)
{
threadsToUpdate.push[thread];
}
}
label.addToThreads(threads)
Add in a little bit of glue and a couple configuration options, and you have a flexible, simple script that gives you the superpower of always knowing which messages might need you to check back in.
Matt adapted his own version of the script to run automatically each day and to only apply the label to messages sent more recently than the last week.
He has also set up the script to exclude messages that include labels where, for example, he has already used Boomerang to track the messages for later. It would also be a snap to update the script to handle aliases (for example, if you use your Gmail account to send a message using your corporate email address) or to look for messages that require a reply from you.
You can get the script here. To customize it, just create your own copy and edit it right inside the built-in editor. With Awaiting Response, Apps Script helped us solve a customer problem in about fifteen minutes, without having to build an entire product.
Alex Moore is the CEO of Baydin, an email productivity company. Baydin makes software that combines AI and behavioral science to ease the burden on overloaded emailers, including the popular Boomerang email scheduling extension, which has been downloaded over two million times. When taking a break from his email, Alex makes a chicken florentine that tastes like angels singing. He is a rabid Alabama football fan.
Posted by Louis Gray, Googler
Calorie Counting with Google Apps Script
Counting Calories using Apps Script
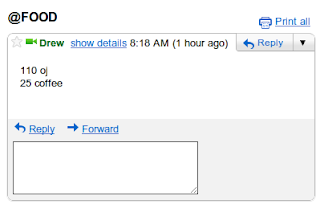
The process is simple. I send an email to myself with the subject
“@FOOD” where the body contains the number of calories in the food and the name of the food, one per line. I wrote a script which, every 15 minutes, scans my email and computes the total of calories I’ve consumed in the last 24 hours and updates a spreadsheet with the total.Why do it this way? Using Gmail for the recording makes it so if I’m offline on my phone, the gmail app will send it when I’m online. Putting it in a Google spreadsheet means I can make a shortcut for it in chrome, and a desktop web shortcut icon on my Android phone for easy access. Additionally, using a spreadsheet allows me to perform other calculations, make charts, etc.
How do you set it up?
First create a new spreadsheet, and click on Tools > Script Editor. Click on File > New > From Script Template. Search for “Calorie Counting” and you will be able to locate the script. Then, click Install and you are all set. Save the script, run it, at which point you’ll get two authorization dialogs, click ok through them. Run it again to make sure it populates the sheet properly. Then, in the script editor, click Triggers>Current script’s triggers and add a new trigger: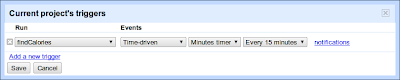
And you’re all set! Your spreadsheet, after the script runs will look like this:
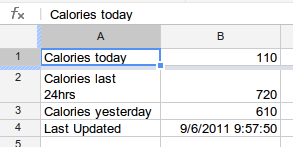
From here the possibilities are endless. I’m thinking I could make a UiApp script which uses the new Charts bean to draw a graph. Perhaps make a service to view/change calories because I mess things up every once in awhile. You could also add code for
“@WEIGH” messages to track weight and could graph that too. Your imagination is the limit! And if you have an even better idea for how to use Apps Script to improve Gmail and Spreadsheets, you can post it to our Gallery (Script Editor > Share > Publish Project) to share with the world. | Drew Csillag Drew is a Software Engineer and Manager at Google on the Google Apps Script project, based in New York. He previously worked on Billing at Google, and for the 13 years before, he has worked on everything from hardware up to GUI frontends and everything in between. |
Monday, March 9, 2015
New security management features for domain users with the Admin SDK
We launched the Admin SDK in May as a new way for developers to build customized administrative tools for organizations that use Google Apps. A top priority for most administrators is keeping their users safe. Today, were adding new security management features to the Directory API to help administrators manage:
- Access granted by domain users to third-party applications
- Application specific passwords created by users
- Backup verification codes for users using 2-step verification.
As an example, FlashPanel, a popular tool used by Google Apps administrators, is using these new features to allow domain admins to review installed applications and manage or revoke access to them. The Apps Explorer in FlashPanel allows admins to see which are the most installed apps in his domain or use a filter to review applications by type of permissions (Drive, GMail, etc). It also allows admins to review the number of users who have granted access to a particular application.
The screenshot below shows an example of FlashPanel’s customized view of third-party application installs.
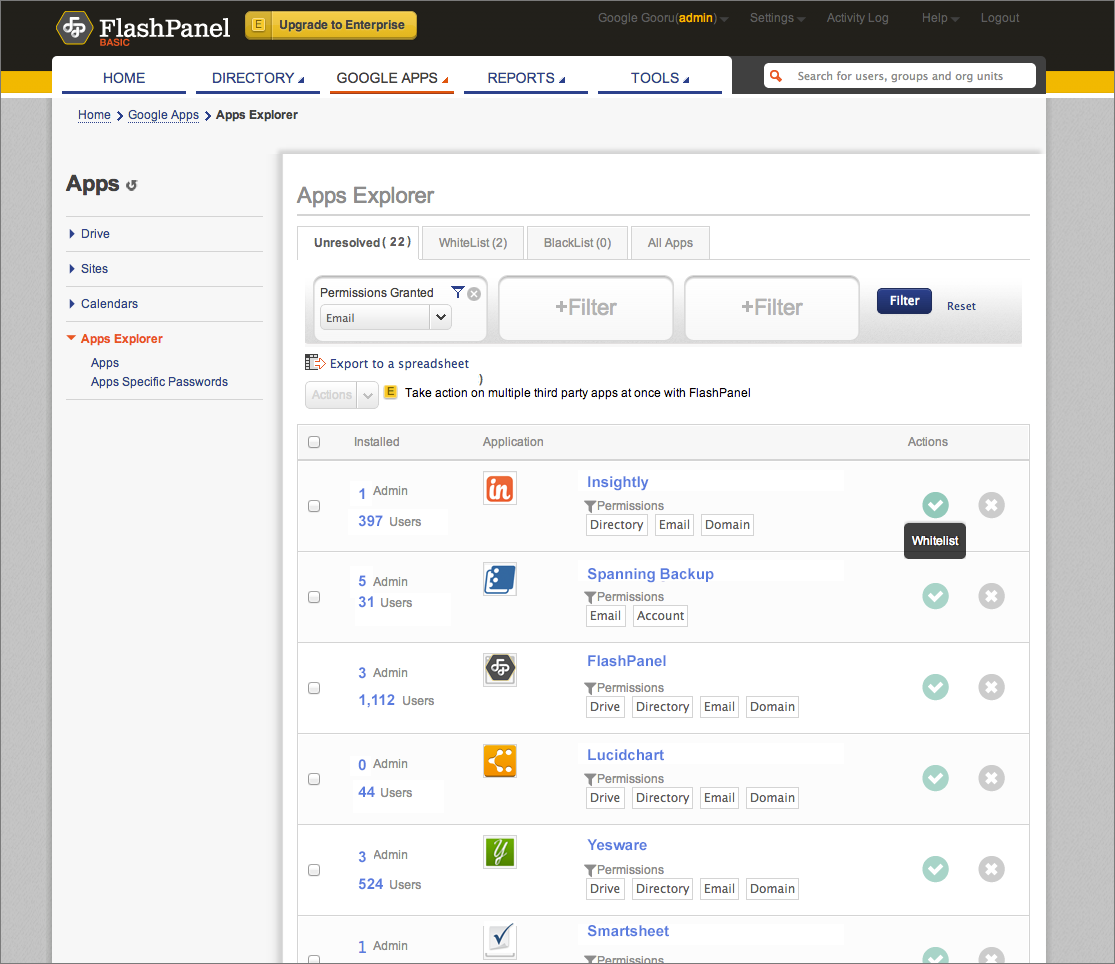
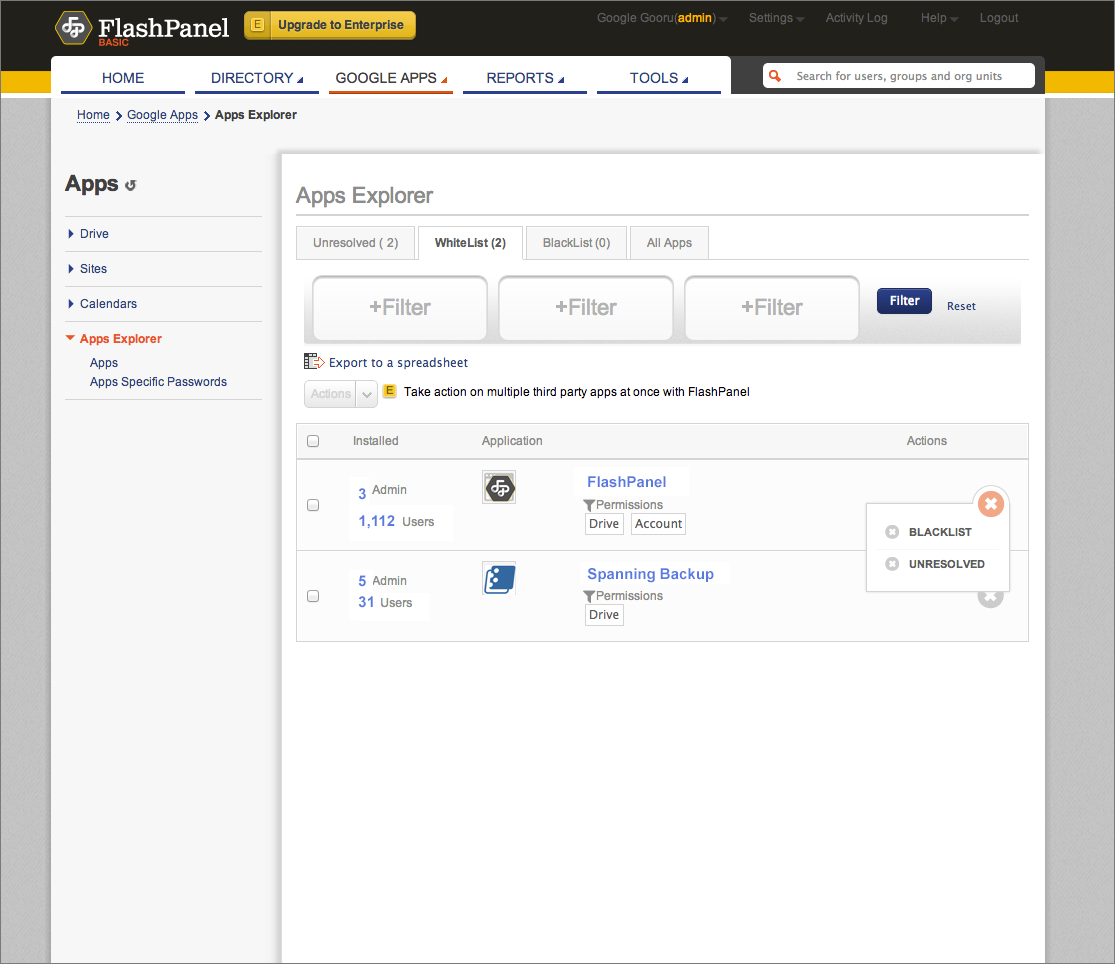
In FlashPanel’s integration, admins have the power to whitelist or blacklist apps, as shown below.
The Directory API now also provides the ability to manage admin notifications that are delivered to the Admin Console. Currently, admins receive notifications for events that affect their domains such as users approaching their storage limits or monthly bills that are due. Now you can use the API to list notifications, update their read status, or pull them into custom tools.
If you are interested in using these new endpoints, please refer to the Directory API documentation.
 | Ajay Guwalani Ajay Guwalani is Product Manager on Google Apps Admin APIs. His current focus is to build next generation admin APIs to make enterprise developers and admins happy. |
Dito Directory integration with Google Apps
The Google Apps Marketplace is a great sales channel that allows us to market our products to millions of Google Apps users. Dito Directory for Google Apps is just the first step for Ditos custom application development on Google technologies like Google App Engine, Google Apps APIs, and Google Web Toolkit. We are excited that Google is now providing us with an advantageous delivery platform for 3rd party apps.
Dito, an IT solution provider specializing in Google Apps, was founded in 2007 by brothers Jim and Dan McNelis to help small and medium sized business enhance their IT infrastructure with cloud-based solutions. Since then, upwards of 40% of our customers have found us on the Google Apps Marketplace, so it was a logical choice to list our application there as well.
The Google Apps Marketplace allows domain administrators to install Dito Directory with a couple easy clicks, making the purchase as painless as possible. Dito Directory uses OpenID for user authentication, which means no additional login is necessary. Once installed via the Marketplace, Dito Directory becomes accessible instantly for Google Apps users via Googles universal navigation.
Dito Directory was developed as a result of customer demand for better contact management. We make it easy to import your existing contacts in bulk via the Google Spreadsheets API, which polls an admins spreadsheets and allows them to easily import existing contacts. As with all of our interactions with user and company data, we leverage 2-legged OAuth for authentication and OpenID for single sign-on. This allows our application to safely and securely access your information without the risk of compromising it to 3rd parties.
Sometimes, Google Apps users need more direct access to a domain shared contacts information. With the "Copy to My Contacts" feature in Dito Directory, admins and users can copy any domain shared contact to their personal contacts, instantly. If a users contacts are synced with their mobile device, the contact will show up on their device nearly as fast. Dito Directory interacts directly with a users contacts via the Contacts API.
Enough about the what and the why...lets talk about how we developed Dito Directory. For that, Vinay Thakker, our Google App Engine-eer, is going to give you his perspective.
Leveraging Google scalability
A week before the launch, we decided to gut the app and start fresh. Despite my successes with application architecture in the past, there was one big thing, from a developers standpoint, that I didnt like with our first attempt:
It didnt scale well.
Of course, I mean that in terms of adding features to it, since App Engine effortlessly handles the load distribution and scaling for us. As the client-side of our app grew, its statefulness became exponentially more difficult to manage. Most of our widgets needed to know about the state of other widgets. Generally, for UI elements, we do this using events. The number of event handlers required to obtain complete state communication in the application grows like the graph of a factorial with each additional widget (no kidding, its painful).
My initial design was the bomb, though. So, why change?
The ease of using GWT makes developing event handlers a breeze, so in the beginning you may not realize what youre signing yourself up for. You can make a monstrous improvement by centralizing your event bus. In doing this, you should consider using the command pattern design. Its benefits are ridiculously awesome, and how you would implement it is probably better to be left to Wikipedia to explain, since thats what I would paraphrase.
Browser history and state related issues
The second big thing that helped us was when we decided to account for browser history. You have to do this from the beginning of your design, but the good news is its freakin easy to implement. Ill show you how in a minute, but first let me mention that implementing GWTs History class is a forcing function for state in your application. By virtue of implementing history across our application, we solved 91% of our state-related issues. On top of that, the user gets their beloved back and forward browser buttons back, as well as some other cool stuff, like the ability to bookmark and link to states of Directory. Using GWTs built-in History class is a two-and-a-half step process. Heres how you do it:
Step 1: Create a class that implements the HistoryListener interface. Its really just one function, onHistoryChanged, in which you tell the app how it should render itself, based on the incoming state. Make it short; have your main class that does onModuleLoad implement HistoryListener.
public class MyApp implements EntryPoint, HistoryListener
{
public void onModuleLoad()
{
}
public void onHistoryChanged(String historyToken)
{
}
}// MyApp
Step 2: Tell the History class that you have a class that wants to listen to changes in the History state. Lets do this in onModuleLoad(). Also, you can choose to fire off the current history state so your onHistoryChange method from above gets called on load. If it makes sense for your app, force it into an initial state, also shown here.
public void onModuleLoad()
{
if (History.getToken().isEmpty())
History.newItem(“myInitialState”);
History.addHistoryListener(this);
History.fireCurrentHistoryState(this);
}
Step 2.5: This isnt really a step. This part belongs to all of the development you would have been doing anyway. This is where you actually add code to your onHistoryChanged method to make it do something useful based on the state.
public void onHistoryChanged(String historyToken)
{
if (“myInitialState”.equals(historyToken))
{
// render the app appropriately for this state.
// this state is accessible at thisPage.html#myInitialState
}
if (“myOtherStateName”.equals(historyToken))
{
// render it another way..
}
}
You can see how this would force state on your app. Youll find that in a lot of cases, you will be able to use traditional anchor links where you might have otherwise created a new Java function and binded it to the onClick event of some object or widget.
Cool stuff. Let us know what you think, or ask Vinay a question, email vinay@ditoweb.com.
Tuesday, March 3, 2015
Incorporate Addition with Sight Words With These Fun Smartboard Promethean Board Games
Well... I figured it out: make them think theyre doing math when theyre really doing ELA! My mathematically inclined students LOVE these games... and dont even realize theyre practicing their sight words in the process of doing addition!
I decided to bridge off of the concept of Scrabble to have students add up the value of words.
I made a few games for the Dolch Sight Words:


I also made a few games for the Fry Words:


Be the first person to comment on this blog post and Ill send you all of the games for free! Dont forget to leave your email address!
Wednesday, February 25, 2015
Change the Capitalization of Your Text with Ease!

A Comparative Analysis with Traditional and Fully Online Graduate Courses
"(Abstract) Blended learning is a hybrid of classroom and online learning that includes some of the conveniences of online courses without the complete loss of face-to-face contact. The present study used a causal-comparative design to examine the relationship of sense of community between traditional classroom, blended, and fully online higher education learning environments. Evidence is provided to suggest that blended courses produce a stronger sense of community among students than either traditional or fully online courses...
Hara and Kling (2001), conducting a study of online courses, found that feelings of isolation were an important stress factor for online students, but not the primary factor as frequently mentioned in the professional literature. Rather, ?[s]tudents reported confusion, anxiety, and frustration due to the perceived lack of prompt or clear feedback from the instructor, and from ambiguous instructions on the course website and in e-mail messages from the instructor? ...
(Conclusion) The blended concept of learning is highly consistent with the three areas of change identified in the introduction:
- thinking less about delivering instruction and more about producing learning,
- reaching out to students through distance education technologies, and
- promoting a strong sense of community among learners.
Indeed, the concept of blended learning may be a synthesis of these areas as the learning environment becomes more learning-centered, with emphasis on active learning through collaboration and social construction of understanding. Such a concept is moving toward O?Banion?s (1997) vision of a learning college as a place where learning comes first and educational experiences are provided for learners anyway, anyplace, and anytime. Graham B. Spanier, president of The Pennsylvania State University, referred to this convergence of online and traditional instruction as the single-greatest unrecognized trend in higher education today (Young, 2002). "
Buzzing with Social Curation Tools!

Today, we are all facing information overload, and it is often difficult to find what we are looking for, especially if we are looking for updated collections of resources to support a topic, issue or idea. Major search engines like Google, Bing and Yahoo dont exactly do a great job in assisting either, which might also be partially due to the growing influence and spam of Search Engine Optimization (SEO) gurus, engines and companies. It is amazing how much spam comments I get on this blog alone (10 - 20 spam comments a day!), thanks to SEO strategies. Amazingly annoying!
DELICIOUS = RIP?
- Pearltrees
A social curation community that empowers you in a social way to discover, organize and share the stuff you like on the web.
- Scoop.it
Create your topic-centric media by collecting gems among relevant social media streams, and then publishing it to people sharing the same interest.
- Trailmeme
Enables you to create a trail of content on a specific topic that’s interesting to you. You can also read other peoples’ trails and walk them to keep up with any updates they make. - Storify
Turn what people post on social media into compelling stories. You collect the best photos, video, tweets and more to publish them as simple, beautiful stories that can be embedded anywhere. - Keepstream
A social media curation tool that gathers all your favorite content in one place. It pulls in content from multiple sources, including Facebook likes and Twitter retweets, and let users build "collections" of social media content. Users control the presentation of their content, add their commentary, and embed these collections on a website or blog. - Curated.by
A growing collection of topics & interests edited, organized and curated by everyone. Follow the topics you are interested in or create and share your own topics with everyone else.
- Pinterest
A content sharing service that allows members to "pin" images, videos and other objects to their pinboard. - Edcanvas
What can you do with a canvas? Student assignments: Web quests, project-based learning and class presentation. Flipped classroom: Easily gather and annotate online resources. 1:1 environments: Share content using just one link Dynamic presentation: Make your class come alive with rich multimedia. - Zite
Zite learns what you like and gets smarter as you use it. Zite analyzes millions of articles each day and brings you the best of your favorite magazines, newspapers, authors, blogs, and videos.
CONTENT CURATION
While we are at curation, here are a few really useful content curation (customizable auto-filters) tools to consider:
- Cadmus
A real-time service that manages your stream (Twitter, FriendFeed and RSS) by displaying the most relevant content since the last time you checked in. It helps you get caught up on what you have missed. - PostRank
Tap into the intelligence of millions of online users active on the Social Web. PostRank captures real-time data and analysis on any topic, trend, or interest relevant to you or your business. - Yahoo Pipes
A powerful composition tool to aggregate, manipulate, and mashup content from around the web. - gRSShopper
A personal web environment (masterminded by Stephen Downes) that combines resource aggregation, a personal dataspace, and personal publishing. It allows you to organize your online content any way you want to, to import content - your own or others - from remote sites, to remix and repurpose it, and to distribute it as RSS, web pages, JSON data, or RSS feeds.
- Easy-to-Use Drag-and-drop and please minimize the clicks and loads... Plain and simple! Works on any mobile device with sizzling simple and user-friendly interfaces.
- Adding & Organizing ResourcesBesides simplifying adding and organizing discoveries (topics, titles, descriptions, tags, etc.), it should have a search feature, and intelligently suggest resources (crawling and filtering out) within the topic (tags) I am using to collect (and even beyond to spark random discoveries).
- Connecting & Collaborating It should enable me easily to connect and collaborate with others on topics, interests or issues, including plucking resources (or pearl branches) from others (giving automated recognitions to original curators), and so on.
- Visually Stimulating & IntuitiveYes, it should be stimulating to the eyes and intuitive to the mind, and obviously be light enough to avoid slow interactions due to possible bandwidth constraints in certain areas, while curating on our mobile devices.
Still havent found the ideal social curation tool :)
Tuesday, February 17, 2015
Zuma Deluxe for PC full version with system requirements

This could get messy. Were not exactly sure on what planet it is that guardian frogs must protect the spiralling corridors of their temples from an unholy invasion of coloured balls, but we suspect its the same one Bub and Bob visited.
Yes folks, you are now entering ball-bursting territory. Abandon all hope of having normal dreams for several days.
Not content with raining down from the skies above in Bust-A-Move, these evil, merciless, relentless coloured balls are now intent on invading and terrorising the confines of the musty, once-deserted chambers of these eerie old shrines. But a wise old frog knows the weaknesses of the nefarious spherical menace; you could call it a good old fashioned trichotomy: twos company, threes a crowd. Its satisfying in the knowledge that however many hundreds pour through the defenceless temple doors, this ball-spitting frog idol can send them packing back from whence they came... with a satisfying pop.
In case we hadnt rammed home the point enough lately, Xbox Live Arcade on 360 is just about the most instantly entertaining way to get your kicks on a home console these days, and thanks to the complete lack of any definable storylines or premise, we get to completely make them up off the top of our heads. Its a win win, and no mistake.
Zuma Deluxe is another one of those games youll probably be familiar with from the previous Live Arcade, or from the shareware scene it originated from. As with almost everything available for download on the 360, it doesnt look anything worth bothering with from the outset. Sure, its in high definition, but it looks simple, dated, low budget and certainly nothing to get excited about. And then, unexpectedly, six hours later youre hauling yourself off to bed with spiralling eyes and humming that tune forever. Read more
System requirements:
Windows 98/ME/2000/XP
Pentium II 350MHz Processor
64MB RAM
DirectX 7
16-bit Video Card
DirectX compatible Sound Card
30MB Hard Disk Space
CD-ROM or DVD-ROM Drive
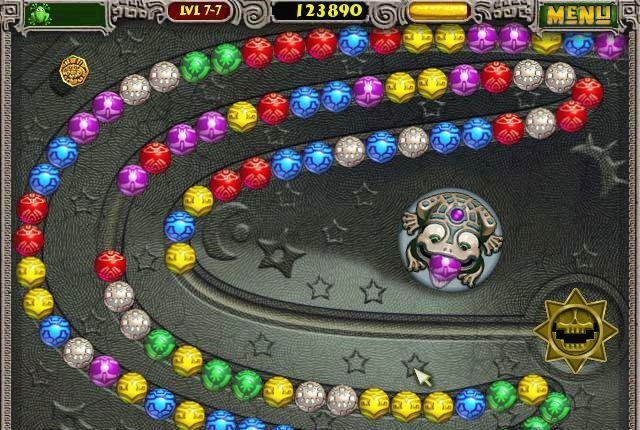
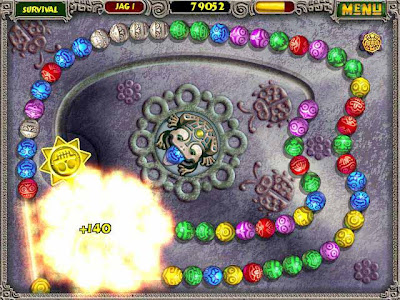
Screen Shots: click on the image to view large
 |  |  |

Zuma Deluxe game for PC: Download
Saturday, February 14, 2015
Working With Error Provider in VB Net Video Tutorial
What is Error Provider?
![Working With Error Provider in VB.Net [Video Tutorial]](https://blogger.googleusercontent.com/img/b/R29vZ2xl/AVvXsEjmjzmtCSKrLJwEQX32mc_myXJXjVsJ-gy58-UaDfKtTC8HZ4ETeEME8XydB9RDeMZrYbRTkE01HBqcnHv1UX9lL1XFln15ZeXW2RTIwcFz9bFhgPZGPvekbo8PZrSGU_bylR0vlwTmug0s/s1600/Working+With+Error+Provider+in+VB.Net.jpg "Working With Error Provider in VB.Net [Video Tutorial]")
How to Use Error Provider in VB.Net
Playing with Date Format in Date selector component in Pentaho CDE Example Converting 2015 02 04 to 4 Feb 15
Thank you Sam Kumar( A community guy) for asking me to explore this and hope this solution might be useful in your project.
Though, there is a direct property of setting format for date in Date selector , that will not work when you set a default value for date type parameter.
Scenario :
Lets say you have given "yesterday" as default value for date parameter and in Date selector if you give "dd-M-yy" format then you can able to see the selected date in that format BUT for the first time you will not find anything in Date selector because your default parameter value is "yesterday"Software Setup :
Problem statement :
Default values like "today", "yesterday", "One week ago", "One month ago" should take 5-Feb-15, 4-Feb-15 and etc format in Date selector when dashboard loads ...
Step by Step Screenshot solution :
1) Design the lay out for Date label & for Date selector (i.e., Html Objects for label & selector - lets assume these html objects are Col1 & Col2).
2) Creating Date parameter : parameter name = date_param
Go to components -> Click on Generic from left side -> Click on Date parameter
Give default value as "yesterday" ( or today or other from the drop down).
3) Creating Date selector for Date parameter created in Step 2 : Date selector name = date_picker
* Components section -> selections -> Date input component
* Give parameter(date_param) for listeners & parameter section.
* Give html object for this (i.e., Col2 )
4) Test -1 : Default view

5) Now, Converting the format
* Go to Advanced properties of Date selector (date_picker)
* Write below code in Post Execution section
function f(){
var date1 = Dashboards.getParameterValue("date_param").toString();
testdate = $.datepicker.formatDate("d-M-y",new Date(date1));
//alert(testdate);
document.getElementById(render_date_picker).value=testdate;
}
6) Save the dashboard and test it : Test -2
parameter default value is : yesterday

Thats it... We are done
Download Example here : Click Me
NOTES :
1) From the stack overflow link below , as the CDE is already integrated with jQuery technology we have to use formatDate function for formatting the date.2) The code should go in Post Execution section.
3) render_date_picker ----> render_ is the keyword for which we attach Date input component name.
4) Code is independent for specific date control as it is going into Date input components own Post Execution section.
for example : I have taken another date component and tested..

References :
1) http://stackoverflow.com/questions/3552461/how-to-format-javascript-date
2) https://jqueryui.com/resources/demos/datepicker/date-formats.html
R&D links from Sam :-)
3)
http://stackoverflow.com/
4)
http://api.jqueryui.com/
:-) Sadhakar Pochampalli :-) BI developer :-)
GTA Vice City for PC full version with system requirements

Grand Theft Auto: Vice City for the PC needs no introduction. Not only is this game in many ways better than its amazing predecessor Grand Theft Auto III, but its also technically superior to the original version of Vice City that was released on the PlayStation 2 a number of months ago. Like GTAIII for the PC, Vice City is identical to the original PS2 version in terms of content, so if youve already played that version to death, you wont find the PC version to be much different. However, the PC version of Vice City does offer enhanced visuals and controls, improved loading times, and a few extra frills. More importantly, it offers the same refreshingly open-ended gaming experience, which has occasionally been reviled for its controversial subject matter, but has far more often elicited much-deserved praise. Simply put, if by some chance youve put off playing Vice City up till now, dont wait any longer.
To be clear, Vice City is an extension of Grand Theft Auto III, rather than a completely overhauled sequel. Thats definitely a good thing, because GTAIIIs freestyle gameplay was extremely entertaining and offered tremendous replay value, yet still had more potential. Vice City fulfills a lot of that potential, as it features improved production values (including over eight hours of licensed music and plenty of Hollywood voice actors), new types of drivable vehicles (motorcycles, helicopters, and golf carts), new weapons, better vehicle damage modeling, indoor environments, and more.
Yet the most obvious difference between GTAIII and Vice City is that in the new game, youre in a brand-new setting, a sprawling city styled after Miami, Florida, circa 1986. Laced with neon and featuring miles of beachfront property, Vice City simply looks a lot more pleasant than GTAIIIs oppressive New York City-inspired Liberty City. Nevertheless, like Liberty City, Vice City is actually a den of corruption and evil. And its your playground. Youre free to roam Vice City on foot or in any manner of vehicle you can get your hands on, and you can undertake a wide variety of action-packed missions, explore the town, wreak havoc, or whatever. The games convincing physics and terrific atmosphere make any of the huge variety of activities available in Vice City enjoyable in themselves, and even greater than the sum of their parts when you put them all together. Youd be hard-pressed to find a single-player action game with more variety than this one, and Vice City will more than likely surprise and impress you even if youve already played GTAIII to death.
System requirements:
MINIMUM PC REQUIREMENTS
Windows 98/ME/2000/XP
MINIMUM
Pentium III or AMD Athlon 800MHz Processor or Intel Celeron or AMD Duron 1.2GHz Processor
128MB RAM
8X CD-ROM Drive
915MB Hard Disk Space
32MB DirectX compatible Video Card
DirectX compatible Sound Card
Keyboard
Mouse
DirectX 9.0
RECOMMENDED
Pentium IV or AMD Athlong XP Processor
256MB RAM
16X CD-ROM Drive
1.55MB Hard Disk Space
64MB DirectX compatible Video Card
DirectX compatible Sound Card with Surround Sound
GamePad
Keyboard
Mouse
DirectX 9.0
Screen Shots: Click on the image to view large
 |  |  |

Internet Download Manager 6 18 Build 7 full version with crack or serial

Review:
Internet Download Manager (IDM) is a tool to increase download speeds by up to 5 times, resume and schedule downloads. Comprehensive error recovery and resume capability will restart broken or interrupted downloads due to lost connections, network problems, computer shutdowns, or unexpected power outages. Simple graphic user interface makes IDM user friendly and easy to use.Internet Download Manager has a smart download logic accelerator that features intelligent dynamic file segmentation and safe multipart downloading technology to accelerate your downloads. Unlike other download managers and accelerators Internet Download Manager segments downloaded files dynamically during download process and reuses available connections without additional connect and login stages to achieve best acceleration performance.
Internet Download Manager supports proxy servers, ftp and http protocols, firewalls, redirects, cookies, authorization, MP3 audio and MPEG video content processing. IDM integrates seamlessly into Microsoft Internet Explorer, Netscape, MSN Explorer, AOL, Opera, Mozilla, Mozilla Firefox, Mozilla Firebird, Avant Browser, MyIE2, and all other popular browsers to automatically handle your downloads. You can also drag and drop files, or use Internet Download Manager from command line. Internet Download Manager can dial your modem at the set time, download the files you want, then hang up or even shut down your computer when its done.
Other features include multilingual support, zip preview, download categories, scheduler pro, sounds on different events, HTTPS support, queue processor, html help and tutorial, enhanced virus protection on download completion, progressive downloading with quotas (useful for connections that use some kind of fair access policy or FAP like Direcway, Direct PC, Hughes, etc.), built-in download accelerator, and many others.
Version 6.18 adds Windows 8 compatibility, adds IDM download panel for web-players that can be used to download flash videos from sites like MySpaceTV, and others. It also features complete Windows 7 and Vista support, video page grabber, redeveloped scheduler, and MMS protocol support. The new version also adds improved integration for IE 10 and IE based browsers, redesigned and enhanced download engine, the unique advanced integration into all latest browsers, improved toolbar, and a wealth of other improvements and new features.
Screen Shots:


Friday, February 13, 2015
TeamViewer v9 0 23724 Server Enterprise full version with crack

Today, TeamViewer announces a new beta version of its popular remote control software for Windows, Mac and Linux PCs. The latest release, named TeamViewer 9 Beta, introduces new features aimed at businesses, developers and end-users as well as security improvements.
The most noteworthy security addition in TeamViewer 9 Beta is two-factor authentication. It allows users to add an extra layer of protection to their accounts by using security codes, that can be sent to their mobile devices and, alternatively, generated by dedicated mobile apps. On Macs, TeamViewer 9 also adds the option to increase the password strength in QuickSupport.
"TeamViewer has always been focused on remote support functionality", says the companys head of product management Kornelius Brunner. "With TeamViewer 9, we are going back to the roots and offering even better features for support teams in companies large and small".
Service Queue is a new TeamViewer 9 Beta feature aimed at IT staffs, that provides the option to assign, manage and share requests for immediate support. Users who join remote support sessions can now use a unique code, that is created specifically for that session, instead of having to exchange a username and password. The unique code can be distributed as a link.
The software adds the option to save customized customer modules with the companys branding (for Host, QuickJoin or QuickSupport) in the TeamViewer Management Console. The modules can be tailored, as needed, to a customer, group or support provider. The customers will receive the latest TeamViewer version, following any modifications.
TeamViewer 9 Beta introduces tab support. This allows users to open multiple remote control sessions and view multiple displays in a single window. Tabs can flash, indicating new activity.
Wake-on-LAN is now supported, allowing users to trigger a remote wake of the PCs they wish to control. The feature only works between devices connected to the same local network.
In TeamViewer 9 Beta users can take advantage of a univeral clipboard, which allows them to copy and paste content from their current device to a remotely-controlled one (files, folders, text and tables are supported). The formatting is carried over.
Using an FTP server, the software allows users to send files to devices and contacts without initiating remote control sessions. This offers an alternative to cloud-based storage services in such instances.
Specifically for Mac users, TeamViewer 9 Beta also adds the file box for quick sharing while using the software and the option to add a disclaimer when creating customized QuickSupport modules, which users have to accept before launching the software.
TeamViewer 9 Beta informs users of any new notifications in the Computers & Contacts area. The notifications include alerts for TeamViewer monitoring, ITBrain, new service cases, new contact requests and service cases assigned to the user. Read more

Road Rash 2002 for PC full version with system requirements

There are two game modes in Road Rash. Thrash mode allows you to select from five skill levels, choose your course, and race. Your progress is not saved, you cannot buy new bikes, nothing. You *can* however race any track at any level and vent your frustration on the other bikers with wanton abandon.
While thrash mode is reasonably cathartic, most people will play most of their games in "Big Game Mode". In this mode, you select which character to play from a list of nearly a dozen "interesting" individuals, each of which has different fighting and racing characteristics, as well as a different model of motorcycle and their own cash reserve. Although most of the rashers are men, there are three female characters available, and my wife had no trouble identifying with at least one of them :-).
You start the "Big Game" on "The Street" in front of "Der Panzer Klub" and "Olleys Skoot-A-Rama". Entering the club allows you to "schmooze" with other rashers who may give you useful information or simply intimidate you. The content of the messages in this area seems to be loosely related to your treatment of your fellow rashers in past races. If you beat up on a particular character, he/she will be hostile. Leaving an individual alone race after race may result in friendlier comments. Pretty cool. I personally got the most enjoyment out of getting Mike and Axel upset, but running Pearl off the road resulted in a particularly nasty surprise as well :-).
From within the club, you can also choose to enter the "Restroom". The restroom is essentially the options menu, allowing you to change the game mode (thrash or big game), select one or two player mode, choose your game level (only in thrash mode), individually turn the engine sounds and in- game music on and off, load and save games, or play with the "jukebox" (more on this in the "sound" section below).
Lastly, you can select the bulletin board to view the available courses and select the one upon which you want to race.
The second major location that you can visit is "Olleys Skoot-A-Rama" cycle shop. Olley has fifteen different bikes from which to choose which are divided into three categories. You can browse all of the bikes to determine prices and set goals for yourself. You can also see stat sheets and a "fly-by" video of each one. The characteristics of each bike are entertaining, if not useful, with adjectives like "blinding" and "orgasmic" used to describe the handling, acceleration, and top speed of each. Judging only from the limited number of cycles that my friends and I have purchased, the variations dramatically affect the gameplay.
There are five courses on which you can race, each of which has different distinguishing characteristics. On one course you race along beaches and through tunnels; on another, you dodge taxis, joggers, and mailboxes; while on yet another, you race through valleys with steep, texture mapped walls. The variety is extremely refreshing. Different levels of the game however, do *not* introduce new tracks, but rather lengthen the same five courses. This results in the first few miles of every area being seen over and over again, although you get to race a few miles farther along each course with each new level. There are several points in the various courses where the road forks into two distinct paths which rejoin before crossing the finish line. Usually, each branch has a different length, number of curves, traffic density, etc. Other racers will sometime suggest a particular branch, although how much you trust them might depend on the number of dents youve made in their skull in previous races :-).
System requirements:
Ram: 16 Mb
Hard: 25 Mb
Cpu:75 Mhz
Windows Xp,Vista
Screen Shots: click on the image to view large
 |  |  |