Friday, March 13, 2015
Selecting Upload Destinations with the Picker API
Drive is a great drop zone for incoming files -- no matter if they’re coming from cameras, scanners, faxes, or countless other devices or apps. But throwing files into the root folder makes it difficult for users to find and organize their content.
I’ve seen developers create a folder when the user first connects the app with Drive to keep files organized by the app that created it. It’s a simple technique that is easy to implement and good default behavior for most applications.
With the Picker API, we can go a step further and offer users the choice of destinations too. For example, I’d like my scanner to put work files in one folder and personal files in another, or even configure multiple destinations depending on the type of document I’m scanning.
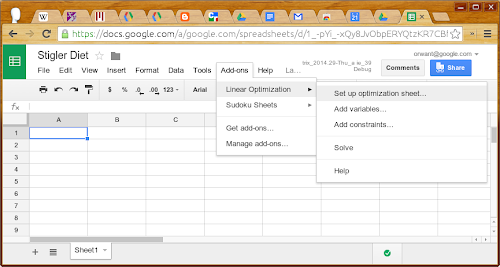
For this particular use case, the picker needs to be configured to show folders and only show folders. That requires customizing the DocsView just a little.
var docsView = new google.picker.DocsView()
  .setIncludeFolders(true)
  .setMimeTypes(application/vnd.google-apps.folder)
  .setSelectFolderEnabled(true);
By enabling folders & the ability to select them while simultaneously filtering out everything else, users can quickly and easily select one of their existing folders as a destination. The rest of the code to show the picker is par for the course.
// Handle user actions with the picker.
var callback = function(data) {
  if (data.action == google.picker.Action.PICKED) {
    var doc = data.docs[0];
    alert("You picked " + doc.id);
  }
};

var picker = new google.picker.PickerBuilder()
  .addView(docsView)
  .setCallback(callback)
  .build();

picker.setVisible(true);
Not only is this easy to implement, it’s safer for users. By offloading this functionality to the Picker API, an app only needs the drive.file scope to write files into the user’s preferred location.
You can learn more about the Picker API at developers.google.com or ask questions at StackOverflow with the google-drive-sdk tag.
 | Steven Bazyl profile | twitter Steve is a Developer Advocate for Google Drive and enjoys helping developers build better apps. |
Sudoku Linear Optimization and the Ten Cent Diet
In 1945, future Nobel laureate George Stigler wrote an essay in the Journal of Farm Economics titled The Cost of Subsistence about a seemingly simple problem: how could a soldier be fed for as little money as possible?
The “Stigler Diet” became a classic problem in the then-new field of linear optimization, which is used today in many areas of science and engineering. Any time you have a set of linear constraints such as “at least 50 square meters of solar panels” or “the amount of paint should equal the amount of primer” along with a linear goal (e.g., “minimize cost” or “maximize customers served”), that’s a linear optimization problem.
At Google, our engineers work on plenty of optimization problems. One example is our YouTube video stabilization system, which uses linear optimization to eliminate the shakiness of handheld cameras. A more lighthearted example is in the Google Docs Sudoku add-on, which instantaneously generates and solves Sudoku puzzles inside a Google Sheet, using the SCIP mixed integer programming solver to compute the solution.
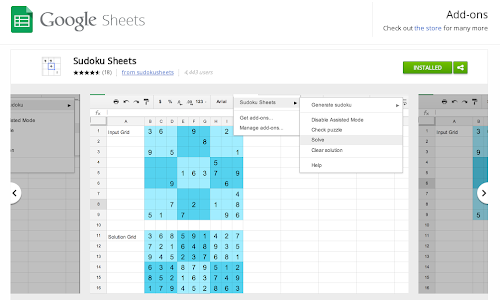
Second, we’re open-sourcing the linear solver underlying the add-on: Glop (the Google Linear Optimization Package), created by Bruno de Backer with other members of the Google Optimization team. It’s available as part of the or-tools suite and we provide a few examples to get you started. On that page, you’ll find the Glop solution to the Stigler diet problem. (A Google Sheets file that uses Glop and the Linear Optimization add-on to solve the Stigler diet problem is available here. You’ll need to install the add-on first.)
Stigler posed his problem as follows: given nine nutrients (calories, protein, Vitamin C, and so on) and 77 candidate foods, find the foods that could sustain soldiers at minimum cost.
The Simplex algorithm for linear optimization was two years away from being invented, so Stigler had to do his best, arriving at a diet that cost $39.93 per year (in 1939 dollars), or just over ten cents per day. Even that wasn’t the cheapest diet. In 1947, Jack Laderman used Simplex, nine calculator-wielding clerks, and 120 person-days to arrive at the optimal solution.
Glop’s Simplex implementation solves the problem in 300 milliseconds. Unfortunately, Stigler didn’t include taste as a constraint, and so the poor hypothetical soldiers will eat nothing but the following, ever:
- Enriched wheat flour
- Liver
- Cabbage
- Spinach
- Navy beans

This optimal meal consists of seared calf liver dredged in flour, atop a navy bean purée with marinated cabbage and a spinach pesto.
Chef Marco reported that the most difficult constraint was making the dish tasty without butter or cream. That said, I had the opportunity to taste our linear optimization solution, and it was delicious.
Thursday, March 12, 2015
Introducing Add ons for Google Forms
Google Forms is a free and simple way to collect information — from quickly polling your friends about wholl be attending your trip to the haunted hayride, to getting thousands of responses to an awareness survey for work.
Over the last few months, Forms has been getting a bunch of updates to help you make good looking surveys, like new theme choices and the ability to create your own personalized themes.
To give you even more flexibility and options, we’re introducing add-ons for Forms—new tools, created by developer partners, that deliver even more features to your surveys (just like add-ons for Docs and Sheets).
Add-ons bring handy extras to your survey building experience, like setting a survey end date, sending custom emails based on responses, storing lists of choices that you frequently add to questions, and more.
You can access Add-ons from the “Add-ons” menu in Forms, or by directly visiting the Forms add-on store.

Here are just a few of the growing list of add-ons that you can use today with Google Forms:
- formLimiter: Close your survey automatically, after a maximum number of responses is reached, or at a date and time of your choosing.
- Ultradox Trigger: Create custom emails, reports, invoices, newsletters, etc., based on information that people enter into your form.
- Form Values: Store and pull from lists that you use regularly in Forms, like a list of staff, students, rooms, resources or anything you want.
PS: If you’re a developer with ideas for creating your own add-on for Forms, here’s some documentation to get you started.
Posted by Saurabh Gupta, Product Manager
An Example of a Self Organizing Team
But before you judge that person, let me tell you a story. In this true story youll have the opportunity to judge me for having the same thoughts before trying a different approach. This is the story of my self organizing daughter.
My kids go to a great school - the kind of school that fosters engaged teachers who go the extra mile to create engaged students. Throughout the school year the teachers run numerous clubs before school, at lunch, or after school including run club, football club, circus club (complete with unicycles!), reading club, wrestling club, girls club, gymnastics club, etc. My kids love attending these clubs and my oldest (aged 10 during this story) was determined to be in every one of those clubs.
This is great, except there were a few problems. Many of the clubs started before the school day so she had to be ready and out the door pretty early. Since most of the clubs had a strict attendance policy (if you miss two days, you are out of the club), being on time was important. Further, because of our cold winter weather, she received a ride on many of the mornings with one of her friends. If she was late getting out the door, her friend also risked being late and missing out on the clubs.
So, being the responsible parents that we are, we nagged her out the door each the morning. "Time to get out of bed", "Have you brushed your teeth yet?" "Go comb your hair", "Its time to make your lunch now!" "Hurray up, youre going to be late!" It made for some pretty frustrating mornings for all of us. We treated her exactly as the statement above: "some people are just lazy and need to be told exactly what to do and when." She would do the task we asked her to do and then wait to be told what to do next. Looking at it now, she was disengaged and dis-empowered. I cringe at the memory.
While this was happening, I was reading the 7 Habits of Highly Effective People by the late Dr. Stephen R. Covey. I had my "Oh crap" moment when he said this:
"You cannot hold people responsible for results if you supervise their methods. You then become responsible for results and rules replace human judgement, creativity, responsibility... Effective leaders set up the conditions of empowerment and then... get out of people’s way, clear their path and become a source of help as requested.“
After talking it over with my wife, we approached our daughter and apologized. We then discussed a new plan with her. Since she clearly was capable of getting out the door on time on her own, she would take over that responsibility. We would make ourselves available to be a source of help if requested but otherwise stay out of it. She jumped at the chance to take ownership of her morning routine. On the first day of this new arrangement she was ready fifteen minutes early and there hasnt been a day since then that she wasnt ready on time. Not so lazy after all I guess - just the victim of well intentioned managers.
After getting over my embarrassment, I pondered how this is a great parallel to self organized teams:
1. Status is known daily. We had daily status of her progress - if she was late she would miss her ride or be kicked out of a club. Our agile teams have daily standups, visual boards, frequent deliveries and demos so that everyone understands that status of the project at all times.
2. Agreed upon goals. She understood the goal (get out the door on time so that she can keep going to clubs) and desired to reach it. Self organized teams need to understand the goals of the project, not just the tasks to complete the project.
3. Freedom over methods. She started out being assigned tasks and moved to taking ownership of her own methods. Self organizing teams are given freedom to achieve the project goals and pull their own tasks rather than being assigned tasks.
4. Ask for help. She wasnt abandoned if she ran into trouble (oh no! I cant find the shirt that matches these pants!) - we stepped into help when asked. An effective scrum master, agile project manager, IT director, etc helps the team in a similar manner.
5. Empowerment brings results. This change turned a painful morning routine into a simple one because she was given the trust and responsibility to achieve the goal. When a team is given the trust and empowerment to accomplish the goal using their own methods, great things occur.
(Note :You can ready a similar story about Dr. Covey and his son entitled "Green and Clean")
Creating More Responsive Applications with Client Handlers and Validators
When it comes to writing UI applications in Apps Script, we get a lot of requests to support event callbacks that are handled in the user’s browser. For example, if your application has a form, you may want to disable a button after it is clicked the first time. Until now, the only way to do that would be by using an event handler on the server to disable that button. Using Client Handlers, your application can now respond to events in the browser without the need to perform a round trip to Google Apps Script servers.
By cutting out the round trip to the server, your app can respond instantly to user input. Imagine, for example, you want to provide your users with instant feedback within your app when a user types text where a number is expected. Ideally, you would want to warn users as they type the value, instead of waiting until the form is submitted. Having a server event handler for each keystroke is definitely overkill for such a simple and common task. Luckily, these use cases are now supported with Apps Script’s new Client Handlers and validators!
Let’s take a look at some code.
Client Handlers
A Client Handler allows you to react to any event in a browser without connecting to the server. What you can do in response to an event is limited to a set of predefined common actions, but you have a lot of flexibility in making your app more responsive.
You can use Client Handlers in any UiApp regardless of whether you are embedding in a Spreadsheet or a Sites Page or publishing as a service. This simple application enables the user to click a button to display the classic “Hello world” message:
function doGet() {
  var app = UiApp.createApplication();
  var button = app.createButton("Say Hello");

  // Create a label with the "Hello World!" text and hide it for now
  var label = app.createLabel("Hello World!").setVisible(false);

  // Create a new handler that does not require the server.
  // We give the handler two actions to perform on different targets.
  // The first action disables the widget that invokes the handler
  // and the second displays the label.
  var handler = app.createClientHandler()
    .forEventSource().setEnabled(false)
    .forTargets(label).setVisible(true);

  // Add our new handler to be invoked when the button is clicked
  button.addClickHandler(handler);

  app.add(button);
  app.add(label);
  return app;
}
The Client Handlers in the above example are set up in two steps:
- Create a Client Handler just as we would create the server handlers you all know and love.
- Define the target widget for this handler. The target widget is the widget on which the handler will take action. We set the handler’s target in one of two ways: (a) By using the
forTargetsmethod to define the target widget. (b) By using theforEventSourcemethod which lets widget wire itself to the client handler.
In the above example, we set the handler’s target to be the event source, so that it will apply to the button that is clicked. Finally, we define the action that the handler should take, in this case disabling the button using setEnabled(false). Aside from setEnabled, you can also change styles using setStyleAttribute, change text using setText, and so on. One Client Handler can perform multiple actions — just chain them together - and you can even change the target so that some actions apply to one set of widgets and some actions to another set. In our example, along with disabling the button, we set the handler to display the label when it is invoked, using setVisible.
Validators
Another new addition to Apps Script is support for validators in handlers. Validators allow handlers to check simple and complex conditions before they are invoked. For example, the following application adds two numbers given by the user, while using validators to make sure the server is only called if both of the text boxes contain numbers.
function doGet() {
  var app = UiApp.createApplication();

  // Create input boxes and button
  var textBoxA = app.createTextBox().setId(textBoxA).setName(textBoxA);
  var textBoxB = app.createTextBox().setId(textBoxB).setName(textBoxB);
  var addButton = app.createButton("Add");

  // Create a handler to call the adding function
  // Two validations are added to this handler so that it will
  // only invoke add if both textBoxA and textBoxB contain
  // numbers
  var handler = app.createServerClickHandler(add)
      .validateNumber(textBoxA)
      .validateNumber(textBoxB)
      .addCallbackElement(textBoxA)
      .addCallbackElement(textBoxB);

  addButton.addClickHandler(handler)

  app.add(textBoxA);
  app.add(textBoxB);
  app.add(addButton);
  return app;
}

function add(e) {
  var app = UiApp.getActiveApplication();
  var result = parseFloat(e.parameter.textBoxA) + parseFloat(e.parameter.textBoxB);
  var newResultLabel = app.createLabel("Result is: " + result);
  app.add(newResultLabel);
  return app;
}
There’s a variety of validators to choose from that perform different tasks. You can verify the input to be a number, an integer, or an e-mail address. You can check for a specific length, or for any numerical value in a defined range. You can also use general regular expressions. Lastly, each validator has its negation.
Note that validators work with both client and server handlers.
Putting it all together
Of course, validators and Client Handlers work best together. For example, in our addition application above, the “Add” button should be disabled as long as the current input is not numeric. We would also like to let the user know why the button is disabled by displaying an error message. To do so, we combine the power of server handlers, Client Handlers, and validators in the following way:
function doGet() {
  var app = UiApp.createApplication();

  // Create input boxes and button.
  var textBoxA = app.createTextBox().setId(textBoxA).setName(textBoxA);
  var textBoxB = app.createTextBox().setId(textBoxB).setName(textBoxB);
  var addButton = app.createButton("Add").setEnabled(false);
  var label = app.createLabel("Please input two numbers");

  // Create a handler to call the adding function.
  // Two validations are added to this handler so that it will
  // only invoke add if both textBoxA and textBoxB contain
  // numbers.
  var handler = app.createServerClickHandler(add)
      .validateNumber(textBoxA)
      .validateNumber(textBoxB)
      .addCallbackElement(textBoxA)
      .addCallbackElement(textBoxB);

  // Create handler to enable the button well all input is legal
  var onValidInput = app.createClientHandler()
      .validateNumber(textBoxA)
      .validateNumber(textBoxB)
      .forTargets(addButton).setEnabled(true)
      .forTargets(label).setVisible(false);

  // Create handler to mark invalid input in textBoxA and disable the button
  var onInvalidInput1 = app.createClientHandler()
      .validateNotNumber(textBoxA)
      .forTargets(addButton).setEnabled(false)
      .forTargets(textBoxA).setStyleAttribute("color", "red")
      .forTargets(label).setVisible(true);

  // Create handler to mark the input in textBoxA as valid
  var onValidInput1 = app.createClientHandler()
      .validateNumber(textBoxA)
      .forTargets(textBoxA).setStyleAttribute("color", "black");

  // Create handler to mark invalid input in textBoxB and disable the button
  var onInvalidInput2 = app.createClientHandler()
      .validateNotNumber(textBoxB)
      .forTargets(addButton).setEnabled(false)
      .forTargets(textBoxB).setStyleAttribute("color", "red")
      .forTargets(label).setVisible(true);

  // Create handler to mark the input in textBoxB as valid
  var onValidInput2 = app.createClientHandler()
      .validateNumber(textBoxB)
      .forTargets(textBoxB).setStyleAttribute("color", "black");

  // Add all the handlers to be called when the user types in the text boxes
  textBoxA.addKeyUpHandler(onInvalidInput1);
  textBoxB.addKeyUpHandler(onInvalidInput2);
  textBoxA.addKeyUpHandler(onValidInput1);
  textBoxB.addKeyUpHandler(onValidInput2);
  textBoxA.addKeyUpHandler(onValidInput);
  textBoxB.addKeyUpHandler(onValidInput);
  addButton.addClickHandler(handler);

  app.add(textBoxA);
  app.add(textBoxB);
  app.add(addButton);
  app.add(label);
  return app;
}

function add(e) {
  var app = UiApp.getActiveApplication();
  var result = parseFloat(e.parameter.textBoxA) + parseFloat(e.parameter.textBoxB);
  var newResultLabel = app.createLabel("Result is: " + result);
  app.add(newResultLabel);
  return app;
}
All of these features can be used to create more advanced and responsive applications. Client handlers can be used to change several attributes for widgets, and validators can help you check a variety of different conditions from well formed email addresses to general regular expressions.
If youd like to chat about these new features or have other questions about Google Apps Script, please join several members of the Apps Script team in the Google Apps Developer Office Hours on Google+ Hangouts tomorrow, Wednesday November 16th at 10am PST. You can also ask questions at any time in the Apps Script forum.
 | Omer Strulovich profile Omer was an intern on the Google Docs team for the summer of 2011. He is now back to pursuing his master’s degree in the field of cryptography. |
Best practices for launching your Marketplace app
Next week, we’ll be hosting a webinar detailing best practices for a successful launch in the Marketplace. We’ll cover the most critical tactics for generating installs of your app based on our learnings from apps that have already launched. We’ll also cover some of the extras you may want to consider to get added mileage out of your launch, as well as ongoing marketing tactics for you to pursue.
Whether you’re totally unfamiliar with the Marketplace, currently developing an app, or have already launched an app in the Marketplace, this webinar should help you maximize your chances of successfully launching an app in the Marketplace. Please join us!
Best practices for a successful launch in the Google Apps Marketplace
Thursday, April 29, 2010 - 10:00 a.m. PDT / 1:00 p.m. EDT / 6:00 p.m. London
Register here for the Webinar.
Remove blogger navbar
Here is the initial tip which didnt work for me. And the final response (comment) there worked for me. Had to place this
#navbar {
height: 0px;
visibility: hidden;
display: none;
}
just bellow the body css selector.
UPDATE: You can also just go to the "Template designer" and at "Advanced" => "Add CSS" add this css:
#navbar{display:none}
Announcing Version 1 8 of the NET library for Google Data APIs
- Google Apps Audit API
- Google Content API for Shopping
- Google Calendar Resource API
In order to improve security and stability, SSL is now turned on by default for all APIs that support it and, since the previous major release (1.7.0.1), more than 30 issues have been Fixed.
For all details, please check the Release Notes:
Want to weigh in on this topic? Discuss on Buzz
Assessing your process 6 great questions
1. Please give me a brief history of the project: timeframes, changes in project size, problem domain, technology used, key events in the life of the project, the general approach.
2. What would you say are the things that worked in the project?
3. What would you say are the things that did not work well?
4. If you were going to start another project, or give advice to someone starting a similar project, what things would you be sure to put in place (recommend)? What are your priorities for those?
5. If you were going to start another project, or give advice to someone starting a similar project, what would you work (recommend) to avoid, or keep from happening?
6. What else?
Pretty simple list - I hope you find these useful as well.
Colour and its relationship to usability
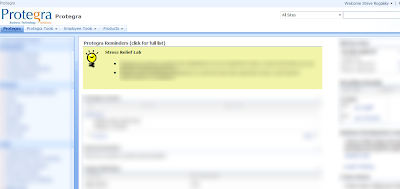
As I returned to work the following week, I noticed that a change was made to our internal dashboard at Protegra. A reminders and announcements section was added and highlighted in yellow/green while the rest of the site remained in blue. Everytime I looked at this site and my eyes were drawn to the words highlighted by the use of colour I thought of Davids presentation.
Here are few other examples that David showed to us to demonstrate how the use of colour could be used to influence user behaviour effectively:
1. Twitter
What are they trying to get you to do?

Sign-Up is highlighted in yellow to attract new users while Search and Sign-in are blue like the rest of the site. Twitter is assuming that if you are already signed up then you are committed to finding the Sign In button on your own.
2. JetBlue
What is important to them?

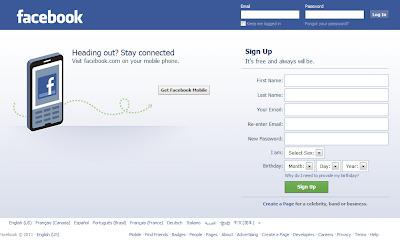
3. Facebook
What are they trying to influence you to do?
Davids presentation has peaked my interest and Ill be looking to find other ways to use colour like this on projects (external facing or not) to guide the user to the actions we would like them to take and discourage them from unwanted actions or workflows. Also, as the Dashboard example shows, it isnt just about highlighting buttons - it can also be about highlighting sections of the site.
Thanks David.
You can find more positive and negative examples and other UX strategies in his presentation found on his site - or join us at SDEC11 to hear him present.
Au to do a sample application using Google Apps APIs in the cloud
One of the big focuses of this blog (and the team behind it) has been providing compelling examples of how integration with Google Apps APIs can make a product richer and more engaging. As a part of this effort, earlier today we announced Au-to-do, a sample application built using Google APIs.
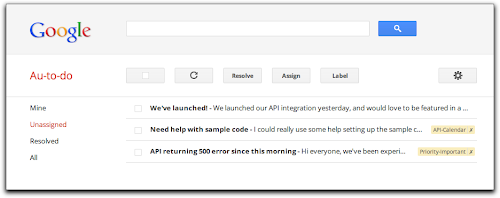
Au-to-do is a sample implementation of a ticket tracker, built using a combination of Google App Engine, Google Cloud Storage, and Google Prediction APIs.
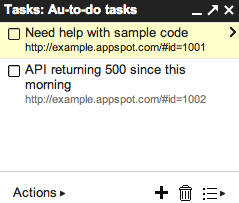
In addition to providing a demonstration of the power of building on Google App Engine, Au-to-do also provides an example of improving the user experience by integrating with Google Apps. Users of Au-to-do can automatically have tasks created using the Google Tasks API whenever they are assigned a ticket. These tasks have a deep link back to the ticket in Au-to-do. This helps users maintain a single todo list, using a tool that’s already part of the Google Apps workflow.
We’re going to continue work on Au-to-do, and provide additional integrations with Google Apps (and other Google APIs) in the following months.
To learn more, read the full announcement or jump right to the getting started guide.
 | Dan Holevoet profile Dan joined the Google Developer Relations team in 2007. When not playing Starcraft, he works on Google Apps, with a focus on the Calendar and Contacts APIs. Hes previously worked on iGoogle, OpenSocial, Gmail contextual gadgets, and the Google Apps Marketplace. |
Day 5 at Agile2010
Dave West talked about Product-Centric Development and the move away from the separation of business and IT (yes please!). He asked us to start measuring ourselves and our teams by how much value we deliver and not by on-time, on-budget, # of defects, # of stories, lines of code, etc. We can’t make our teams act as part of the business unless we change our measurements.
Ron Jeffries and Chet Hendrickson provided both comic relief and poignant commentary. I think Chets comment sums up their talk: "there’s lots of ideas out there and we need to look at every damn one of them”.
Finally, Mike Cohns talk was a great ending to the conference as he challenged us with some practical ideas of how to spread what we’ve learned using the ADAPT model. Create Awareness of the problem by communicating using metrics and stories. Focus on one or two reasons to change. Increase the Desire to change by communicating that there is a better way. Get the team to take agile for a test drive and focus on addressing any fears. Develop the Ability to work in an agile manner by providing coaching and training. Promote agile by publicizing success stories or holding agile safaris where people can drop in to agile teams for a short time to see how it works. Transfer agile to all non development teams, departments, divisions, etc. Align promotions, raises, HR, and Marketing. Finally, don’t expect an agile transition to happen all at once. Create an improvement backlog and improvement communities and work on a few stories that are important to your community before tackling the next ones.
A final call to action from Mike: “Now we’ve upped our skills, up yours!” Well said.
Wednesday, March 11, 2015
Your apps Google Apps awesome
We are starting to roll out some significant changes that will make it easier for developers to build, deploy, and market applications for domain installation. This is a major improvement to our existing Google Apps Marketplace experience that we originally launched in 2010. You can get started right away by following our documentation here.
Some of the major enhancements in the new Google Apps Marketplace:
Improved security — Domain admins can install and authorize your applications for specific organizational units rather than the whole domain.
Consistent development experience — Use OAuth 2.0 for authorization and manage Google APIs in the Google Developer console.
Test before publishing — Test your app easily using the “Test Install” button in the Google Developers console vs. having to publish a live app.
Simplified publishing experience — Publish to the Chrome Web Store to use a single app listing for apps that work with both Google Drive and Google Apps for Business.
Deeper integration — Integrate with services like Google Drive and Google+ and into Google’s new app launcher.
Easier discoverability — Domain admins can discover your great apps directly from the Admin console.
We love our developers who are building third-party solutions for Google users. Please provide feedback on how we can improve the experience and help you connect with over 5 million companies that use Google Apps to improve how they get work done. Here are some great apps to get you inspired - Promevo gPanel, Draw.io, UberConference, AODocs, Spanning Calendar Undelete, Flashpanel, and MindMeister. Get started with your Google Apps integration today!
 | Arun Nagarajan profile Arun is a Developer Advocate on Google Apps. Arun works closely with the community of partners, customers and developers to help them build compelling applications on top of Google Apps. Arun is originally from the Boston area and enjoys basketball and snowboarding. |
Exporting native Google documents with the Google Drive SDK
Three months ago, we launched Google Drive along with the Google Drive SDK. The SDK allows applications to manage files that users have uploaded to Drive and to integrate deeply in the Google Drive UI. Today, we’ve just extended the SDK to allow developers to interact with native Google Docs types such as Google Spreadsheets, Presentations, Documents, and Drawings.
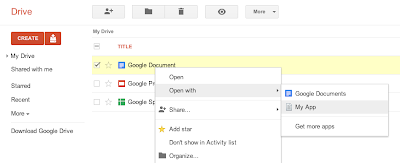
We now provide an easy way to export native Google documents through the Google Drive API. We also allow native Google documents to be opened directly from within the Google Drive UI using third-party applications.
If your application is already a Drive-installable app, you can enable this feature by checking the Allow users to open files that can be converted to a format that this app can open option in the Google APIs Console under Drive SDK > Import:
When this feature is enabled, your application will show up under the “Open with” menu in the Google Drive Web UI for the file formats you support. Here’s how it works: if your application supports opening one of the possible export formats for the Google document, users will be able to open that Google document with your application. So for instance, if your application is configured to open PDF files, then because Google Documents are exportable to PDF, users will be able to use your application to open those documents as shown below.
When opening a native Google Document with your application from the Google Drive UI, we will pass the following JSON Object in the state URL parameter of the OAuth 2.0 redirect request that is forwarding the user to your website.
{
  "exportIds": ["file_id"],
  "action":"open"
}
Then you can use the file ID contained in the JSON object to query the Google Drive API and fetch the file’s metadata. Note that the state URL parameter is different when opening regular files as we use the JSON attribute exportIds instead of ids.
Unlike the metadata of regular files which contain a downloadUrl attribute which you can use to download the file’s content, the metadata for native Google documents contains a collection of export URLs. These URLs - one for each supported export format - are listed under the attribute exportLinks, as shown in the HTTP request/response below.
Request:
GET /drive/v2/files/<file_id> HTTP/1.1
Host: www.googleapis.com
Authorization: Bearer <access_token>
Response:
HTTP/1.1 200 OK
Status: 200
...

{
 "kind": "drive#file",
 "id": "<file_id>",
 ...
 "exportLinks": {
  "application/vnd.oasis.opendocument.text": "https://docs.google.com/...",
  "application/msword": "https://docs.google.com/...",
  "text/html": "https://docs.google.com/...",
  "application/rtf": "https://docs.google.com/...",
  "text/plain": "https://docs.google.com/...",
  "application/pdf": "https://docs.google.com/..."
 },
 ...
}
You can query any of these export URLs using an authorized request to download the Google document in your prefered export format.
Below is the full list of supported export formats -- and their associated MIME types -- for the different types of native Google documents:
Google Documents:
- Text File (TXT) - text/plain
- Portable Document Format (PDF) - application/pdf
- OpenDocument Text Document (ODT) - application/vnd.oasis.opendocument.text
- Microsoft Word (DOC) - application/msword
- Hypertext Markup Language (HTML) - text/html
- Rich Text Format File (RTF) - application/rtf
Google Spreadsheets:
- Portable Document Format (PDF) - application/pdf
- Microsoft Excel Spreadsheet (XLS) - application/vnd.ms-excel
- OpenDocument Spreadsheet (ODS) - application/x-vnd.oasis.opendocument.spreadsheet
Google Presentations:
- Text File (TXT) - text/plain
- Portable Document Format (PDF) - application/pdf
- Microsoft Office Open XML Format Presentation (PPTX) - application/vnd.openxmlformats-officedocument.presentationml.presentation
Google Drawings:
- Scalable Vector Graphics (SVG) - image/svg+xml
- JPEG Images (JPEG) - image/jpeg
- Portable Network Graphics (PNG) - image/png
- Portable Document Format (PDF) - application/pdf
Please check out the Google Drive SDK documentation if you’d like to learn more, and feel free to ask any questions you may have on Stack Overflow.
 | Nicolas Garnier profile | twitter | events Nicolas Garnier joined Google’s Developer Relations in 2008 and lives in Zurich. He is a Developer Advocate focusing on Google Apps and Web APIs. Before joining Google, Nicolas worked at Airbus and at the French Space Agency where he built web applications for scientific researchers. |
Concurrency and Google Apps Script
Here’s the scenario: you create a form, you have a script that triggers onFormSubmit and all is well... until it gets popular. Occasionally you start having interlacing modifications from separate invocations of your script to the spreadsheet. Clearly, this kind of interlacing is not what you intended for the script to do. Up until now, there was no good solution to this problem -- except to remain unpopular or just be lucky. Neither are great solutions.
Now, my friend, you are in luck! We’ve just launched the LockService to deal with exactly this problem. The LockService allows you to have only one invocation of the script or portions thereof run at a time. Others that would’ve run at the same time can now be made to wait nicely in line for their turn. Just like the line at the checkout counter.
The LockService can provide two different kinds of locks-- one that locks for any invocation of your script, called a public lock, and another that locks only invocations by the same user on your script, called a private lock. If you’re not sure, using a public lock is the safest bet.
For example, in the scenario in the previous paragraph you would want something like this:
function onFormSubmit() {
  // we want a public lock, one that locks for all invocations
  var lock = LockService.getPublicLock();
  lock.waitLock(30000);  // wait 30 seconds before conceding defeat.
  // got the lock, you may now proceed
  ...whatever it used to do here....
  lock.releaseLock();
}
It’s best to release the lock at the end, but if you don’t, any locks you hold will be released at the end of script execution. How long should you wait? It depends on two things mainly: how long the thing you’re going to do while holding the lock takes, and how many concurrent executions you expect. Multiply those two and you’ll get your timeout. A number like 30 seconds should handle a good number of cases. Another way to pick the number is frankly to take an educated guess and if you guess too short, the script will occasionally fail.
If you want to avoid total failure if you can’t get the lock, you also have the option trying to get the lock and doing something else in the event of not being able to get it:
function someFunction() {
  var lock = LockService.getPublicLock();
  if (lock.tryLock(30000))  {
    // I got the lock!  Wo000t!!!11 Do whatever I was going to do!
  } else {
    // I couldn’t get the lock, now for plan B :(
    GmailApp.sendEmail(“admin@example.com”, “epic fail”,
        “lock acquisition fail!”);
  }
}
So now your scripts can be as popular as they can get with no worries about messing up shared resources due to concurrent edits! Check out the LockService documentation for more information.
 | Drew Csillag Drew is a Software Engineer and Manager at Google on the Google Apps Script project, based in New York. He previously worked on Billing at Google, and for the 13 years before, he has worked on everything from hardware up to GUI frontends and everything in between. |
Why is collective team ownership and commitment better than individual ownership and commitment
Team ownership reduces the risk of having or creating one smart person in the room (i.e. bottleneck) who does all the work. Even though Jim may be the best person to complete the job, if Tim and Jane work on it together with Jim it will take a little longer initially to complete the task, but those gains will be realized over the long term as the whole team becomes better at accomplishing each task and filling each role. While a cross functional team isnt always easily or immediately created, eventually that team can function effectively to complete any task even if one or more team members are missing.
Collective ownership should result in less items that are in progress. Work in progress tasks have zero realized value to the organizations goals. If we commit to and own items as a team, we should work hard to get them done one at a time so that we can realize the value of those items sooner. Rather than 5 people completing 5 tasks individually that are finished together at the end of the month, task 1 is finished and creating value at the end of week 1, task 2 at the end of week 2, etc.
Quality has a better chance of being built in from the beginning when a team owns and takes responsibility of a task together. As the team works together on a backlog item, we will collectively discover our quality blind spots earlier in the process and adjust accordingly. When I work on an item myself and then present it to the team for review after Im finished, there will be more re-work required to incorporate the ideas of my team members in order to mark the item as done. It is critical to get feedback early and often in order to fail fast and improve quality. Teamwork is an effective way to accomplish this.
Finally, collective team ownership promotes... teamwork. Individual accountability and responsibility tend to generate selfish behaviour (Im working on my task that Ill be measured on so I cant help you with yours). Team accountability and responsibility builds a stronger team because if any one task is sub par it reflects on the whole team and not on an individual.
Of course, this doesnt work very well if we dont sit together - which is why we do.
Enabling Single Sign on with OpenID for the Google Apps Marketplace
We chose to power our Single Sign On (SSO) using OpenID because it’s the predominant open standard for federated identity on the web. The protocol is supported by a large number of OpenID identity providers and many sites around the web accept it. And to make Single Sign On easy to access, Marketplace apps also plug in to both the universal navigation bar inside Gmail, Calendar, Docs, and Sites, as well as the administrative control panel.

<Extension id="navLink" type="link">
  <Name>Amazing Cloud App</Name>
  <Url>http://www.example.com/home.php?domain=${DOMAIN_NAME}</Url>
</Extension>

<Extension id="realm" type="openIdRealm">
  <Url>http://www.example.com</Url>
</Extension>
With this XML in the application manifest, a link called “Amazing Cloud App” will appear in the universal navigation of all Google Apps. Also, if one of the realms specified in the manifest file precisely matches the openid.realm in the OpenID request, then the user will be seamlessly signed into the app after clicking on the link in the universal navigation (without seeing a typical OpenID interstitial allow/deny page).
Of course, you’ll also need code in your application which accepts OpenID logins. In addition to open source libraries, here are a few companies that are making it easier for cloud applications to integrate with the Google Apps Marketplace. Their code provides simple APIs with which developers can integrate, leaving some of the complexities of the OpenID protocol to be implemented by the experts -- no need to hand-roll your own OpenID code.
- JanRain
JanRain’s open source PHP and Ruby OpenID libraries and on-demand RPX solution enabled the implemention of OpenID for many of the companies that launched on the Google Apps Marketplace by writing simple code or web service calls. - Ping Identity
Ping’s PingFederate is an on-premise service that allows SaaS applications to easily accept OpenID and SAML-based logins by integrating with their libraries or using their web server or application server plug-ins. - TriCipher
TriCipher’s myOneLogin Identity Services is an on-demand application that allows developers to accept OpenID, SAML and other federation protocols by writing simple web service calls.
Their are plenty of open source OpenID libraries available for other platforms, such as OpenID4Java (using Step2 code for Google Apps) and DotNetOpenAuth. More information on implementing Single Sign On in Google Apps Marketplace apps can be found on code.google.com.
If you need additional information on building apps for the Google Apps Marketplace, see the Developer’s Overivew on code.google.com.
Admin SDK and Google APIs for business
Today, were announcing the Admin SDK, which enables developers to build customized administrative tools for organizations that use Google Apps. The new Admin SDK consolidates many of the existing domain APIs into a new uniform structure and introduces new functionality with the Directory API and Reports API. We’re starting to pilot Google+ Domains API.
Directory API
The new Directory API provides a simple, RESTful interface to support all basic operations required to query & manage users, groups, organizational units, Chromebooks and mobile devices.Reports API
The new Reports API gives developers a consolidated view of reporting and auditing for domains. Developers can build applications that can monitor and search across usage statistics and activities within a domain.Google+ Domains API
Businesses are using Google+ to help employees collaborate more easily and get things done. Developers will soon be able to auto-provision Circles, read/write posts, and more from the new APIs. Let us know if youre interested in learning more about this API when its available.To begin using the Admin SDK follow the instructions in the API documentation. You will need to sign in to the Google APIs Console and activate the Admin SDK. If you have any questions, join the conversation at Stack Overflow.
Note about API deprecation:
With the introduction of the Directory and Reporting APIs in the new Admin SDK the following APIs will be deprecated per their standard deprecation policy: Google Apps Profiles, Provisioning, Admin Audit, Reporting, Reporting Visualization.
 | Ajay Guwalani Ajay Guwalani is Product Manager on Google Apps Admin APIs. His current focus is to build next generation admin APIs to make enterprise developers and admins happy. |
Get coding fast with Code School and the Google Drive API
Code School has been doing exciting things with learning to program online. This is why we decided to team up with them to create a way for developers to learn to use the Google Drive API, with no setup required. In the Discover Drive course, you can learn at your own pace from your web browser. You’ll spend less time fussing with coding environments and more time writing code.
To find out what the course is all about, go check it out at Code School. Happy coding!
Cross-posted on the Google Developers Blog.
 | Greg Knoke Google+ Greg Knoke is a technical writer in the Google Drive Developer Relations Team. Prior to joining Google, he worked as a scientist developing image and signal processing algorithms. His current interests include new technologies, content management, information architecture, cooking, music, and photography. |
More administrative APIs now available to all Google Apps editions
Google Apps domain administrators have access to a number of APIs to automate their management activities or to integrate with third-party applications, including the Provisioning API to manage user accounts and groups, the Admin Audit API, Admin Settings API, and the Reporting API.
These APIs were only available in Google Apps for Business, Education and ISP editions but many administrators of the free version of Google Apps also requested access to them. I’m glad to say that we listened to your feedback and, starting today, we made the these APIs available to all Google Apps editions.
Please check the documentation as the starting point to explore the possibilities of the APIs and post on our forum if you have questions or comments.
 | Claudio Cherubino profile | twitter | blog Claudio is a Developer Programs Engineer working on Google Apps APIs and the Google Apps Marketplace. Prior to Google, he worked as software developer, technology evangelist, community manager, consultant, technical translator and has contributed to many open-source projects, including MySQL, PHP, Wordpress, Songbird and Project Voldemort. |
Contact Sharing using Google Apps Script
You just created your own contact group in Google Apps Contact Manager and now you want to share this contact group with a few other coworkers (not the entire company). Over the last couple of years, our team at Dito often got this request from our customers. We decided to leverage Google Spreadsheets & Google Apps Script to allow sharing of user’s “personal contact group” with only a select group of coworkers.
How does it work?
The Apps Script implements a three step wizard. Upon completion of the wizard, the script sends the sharing recipients a link to open the spreadsheet to import the user’s recently shared contact group. The three steps in the wizard are.- Step 1 lists all the current contact groups in user’s account. The user can select the group he/she wants to share.
- Step 2 allows user to select the colleagues with whom the user wants to share his/her personal contact group with.
- Step 3 lets the user submit the sharing request.

Designing using Apps Script Services
Apps Script has various services which can be used to build the user interface, access the user’s contact list and send emails without the need to compile and deploy any code.1. Security (guide)
Before a script can modify a user’s contacts, it needs to be authorized by that user. The authorization process takes place when a user executes the script for the first time. When a user makes a request to share his/her contacts, our script sends a link to the intended recipients by email. Upon clicking this link and the “Run Shared Contact Groups” button in the spreadsheet, the recipient will first need to grant authorization to execute the script. By clicking the “Run Shared Contacts Groups” button again, the script will proceed with creating the shared contact group.2. Spreadsheet Service
In developing this script, there was a fair amount of data that needed to be exchanged between different users. We used Apps Script’s Spreadsheet Service for temporarily storing this data.var group = ContactsApp.getContactGroup("Sales Department");
// from that group, get all of the contacts
var contacts = group.getContacts();
// get the sheet that we want to write to
var ss = SpreadsheetApp.getActiveSpreadsheet();
var sheet = ss.getSheetByName("Contact Data");
// iterate through contacts
for (var i in contacts) {
//save each of the values into their own columns
sheet.getRange(i, 1, 1, 1).setValue(contacts[i].getGivenName());
sheet.getRange(i, 2, 1, 1).setValue(contacts[i].getFamilyName());
...
sheet.getRange(i, 13, 1, 1).setValue(contacts[i].getWorkFax());
sheet.getRange(i, 14, 1, 1).setValue(contacts[i].getPager());
sheet.getRange(i, 15, 1, 1).setValue(contacts[i].getNotes());
}
3. Ui Service
Ui Services in Google Apps Scripts have an underlying Google Web Toolkit implementation. Using Ui Services in Apps Script, we easily built the user interface consisting of a 3 step wizard. In designing Ui using Ui Services, we used two main types of Ui elements - Layout Panels and Ui widgets. The layout panels, like FlowPanel, DockPanel, VerticalPanel, etc., allow you to organize the Ui widgets. The Ui widgets (TextBoxes, RadioButtons, etc.) are added to layout panels. Ui Services make it very easy to assemble and display a Ui interface very quickly.
We built each of the components on their own, and then nested them by using the “add” method on the desired container. The UI widgets in the screenshot above were constructed by the code below:
var app = UiApp.createApplication().setWidth(600).setTitle(Share The Group);
// create all of the structural containers
var tabPanel = app.createTabPanel();
var overviewContent = app.createFlowPanel();
var step1Content = app.createFlowPanel();
var step2Content = app.createFlowPanel();
var step3Content = app.createFlowPanel();
// create u/i widgets
var selectLabel = app.createLabel("Select one of your Contact Groups you want to share with others.");
var contactGroupDropdown = app.createListBox().setName(groupChooser);
// add all children to their parents
overviewContent.add(selectLabel);
overviewContent.add(contactGroupDropdown);
tabPanel.add(overviewContent,"Overview");
tabPanel.add(step1Content,"Step 1");
tabPanel.add(step2Content,"Step 2");
tabPanel.add(step3Content,"Step 3");
app.add(tabPanel);
// tell the spreadsheet to display the app weve created.
SpreadsheetApp.getActiveSpreadsheet().show(app);
Continuing with this pattern, we created a pretty complex design using the UI Services. The next step in building a useful user interface is actually building in event handlers for the UI Widgets. Event Handlers let Apps Script know which function you want to run when your script needs to respond to a given user interaction. The code below is an example of a DropDownHandler that we used in our script in Step 1 of the wizard.
// callback element is passed in with the event.
function changeEventForDrowdown(el) {
Browser.msgBox("The dropdown has changed!");
}
// create event handler object, indicating the name of the function to run
var dropdownHandler = app.createServerChangeHandler(changeEventForDrowdown);
// set the callback element for the handler object.
dropdownHandler.addCallbackElement(tabPanel);
// add the handler to the "on change" event of the dropdown box
contactGroupDropdown.addChangeHandler(dropdownHandler);
4. Contacts Service
When a user of the script chooses to share a specific group, the script saves that group contact data into a spreadsheet. When a sharing recipient clicks on the run button to accept the contacts share request, the script fetches the contact group data from the spreadsheet and uses the Contacts Service to create contacts for the share recipients.for (var i = 0; i < sheet.getLastRow(); i++) {
var firstName = sheet.getRange(i, 1, 1, 1).getValue();
var lastName = sheet.getRange(i, 2, 1, 1).getValue();
var email = sheet.getRange(i, 3, 1, 1).getValue();
var myContact = ContactsApp.createContact(firstName, lastName, email);
// ...
// set other contact details
// ...
myContact.addToGroup(group);
}
As this application shows, Apps Script is very powerful. Apps Script has the ability to create applications which allow you to integrate various Google and non-Google services while building complex user interfaces.
You can find Dito’s Personal Contact Group Sharing Script here. Click here to view the video demonstration of this application. You can also find Dito Directory on the Google Apps Marketplace.
Want to weigh in on this topic? Discuss on Buzz