Wednesday, March 11, 2015
Managing groups using the new Groups Settings API
The recently launched Groups Settings API allows Google Apps domain administrators to write client applications for managing groups in their domain. Once you have created the groups and added members using the Provisioning API, you can use the Groups Settings API to perform actions like:
- manage access to the group
- configure discussion archiving
- configure message moderation
- edit a groups description, display format and custom fields
Let’s have a look at how you can make authorized calls to the Groups Settings API from your client application.
Getting Started
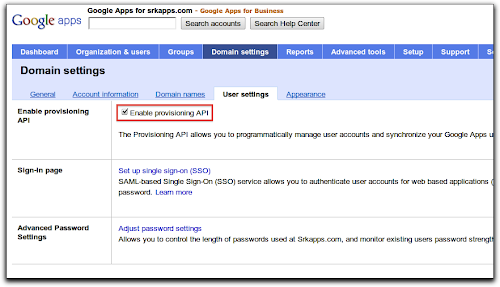
You must enable the Provisioning API to make requests to the Groups Settings API. You can do so by enabling the Provisioning API checkbox in the Domain settings tab of your Google Apps control panel.
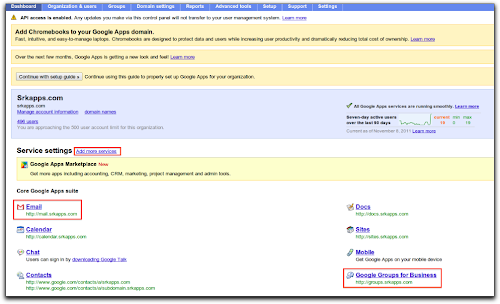
Next, ensure that the Google Groups for Business and Email services are added to your domain by going to the Dashboard. If these services are not listed, add them by going to Add more services link next to the Service settings heading.
Now you are set to write client applications. Lets discuss the steps to write an application using the Python client library. You need to install the google-api-python-client library first.
You can register a new project or use an existing one from the APIs console to obtain credentials to use in your application. The credentials (client_id, client_secret) are used to obtain OAuth tokens for authorization of the API requests.
Authorization using OAuth 2.0
The Groups Settings API supports various authorization mechanisms, including OAuth 2.0. Please see the wiki for more information on using the library’s support for OAuth 2.0 to create a httplib2.Http object. This object is used by the Groups Settings service to make authorized requests.
Make API requests with GroupSettings service
The Python client library uses the Discovery API to build the Groups Settings service from discovery. The method build is defined in the library and can be imported to build the service. The service can then access resources (‘groups’ in this case) and perform actions on them using methods defined in the discovery metadata.
The following example shows how to retrieve the properties for the group staff@example.com.
service = build(“groups”, “v1”, http=http)
group = service.groups()
g = group.get(groupUniqueId=”staff@example.com”).execute()
This method returns a dictionary of property pairs (name/value):
group_name = g[name]
group_isArchived = g[isArchived]
group_whoCanViewGroup = g[whoCanViewGroup]
The update method can be used to set the properties of a group. Let’s have a look at how you can set the access permissions for a group:
body = {whoCanInvite: ALL_MANAGERS_CAN_INVITE,
        whoCanJoin: ‘INVITED_CAN_JOIN’,
        whoCanPostMessage: ‘ALL_MEMBERS_CAN_POST’,
        whoCanViewGroup: ‘ALL_IN_DOMAIN_CAN_VIEW’
       }

 # Update the properties of group
 g1 = group.update(groupUniqueId=groupId, body=body).execute()
Additional valid values for these properties, as well as the complete list of properties, are documented in the reference guide. We have recently added a sample in the Python client library that you can refer to when developing your own application. We would be glad to hear your feedback or any queries you have on the forum.
 | Shraddha Gupta profile Shraddha is a Developer Programs Engineer for Google Apps. She has her MTech in Computer Science and Engineering from IIT Delhi, India. |

Thursday, February 5, 2015
How To Reset Back To The Default Photoshop Settings
- Launch the Photoshop application and immediately hold down the CTRL+ALT+SHIFT (Windows) or COMMAND+OPTION+SHIFT (Mac) keys.
- Click Yes when you are prompted with the message that asks "Delete the Adobe Photoshop Settings File".
When your Photoshop application initializes, it should now have reverted back to the default settings.
Android beginner tutorial Part 77 Settings
Settings can be an important part of some Android applications. They allow users to change the behavior of the application using a list of components that let the user control their preferences.
There is a native way of providing modifiable settings for your application using the Androids Preference APIs.
To create a settings Activity for your application, you dont need to display and handle all the Views on your own. The whole process can be done by providing an XML file which is built using subclasses of the Preference class.
Each Preference is an item in a list and provides an approporiate native way to modify a setting. Each Preference that you add has a key-value pair that is used to save the respective setting in a SharedPreferences file for your applications settings. The file is used to read the setting values in your application to modify its behaviour.
The values stored in that file for each setting can be one of the following types: Boolean, Float, Int, Long, String or Set of Strings.
The class used for building the settings Activity is PreferenceActivity. It is supported by all Android versions. There is another way to display the settings screen for Android versions 3.0 and higher - that is to create a normal Activity and use a PreferenceFragment inside of it that displays the settings.
As I said before, each setting in the application is represented by an instance of a Preferences subclass. Some of the most commonly used ones are CheckBoxPreference, ListPreference and EditTextPreference.
The CheckBoxPreference component is an item with a checkbox and works like a switch - possible values are true and false, so the data type is Boolean.
The ListPreference class is an item that opens a dialog with a list of radio buttons that the user can select. The saved data type can be any type listed above.
The EditTextPreference preference opens a dialog that lets the user input their text, saved data type is a String.
And that will be all for today. Next time well try creating a preference screen ourselves.
Thanks for reading!