Showing posts with label terrain. Show all posts
Showing posts with label terrain. Show all posts
Wednesday, February 18, 2015
Terrain Correction of SAR Images Part 3
The most convenient way to process large quantities of SAR data is using the methods through command line. With the "gpt" command as described in the Nest help pages you can process single scenes from command line, but here is a way to process large quantities of scenes from command line. With the DOS "for" command you recursively search through your directories for scenes to be processed and hand these scenes each to the gpt command.
Here is how to do it:
First you create the processing chain with the graph builder as described in part 2 and save it as an XML file. Especially in the beginning, you may want to keep it to simpler processing chains not containing all tasks at once. In our case, lets take only the SARSIM Terrain Correction:
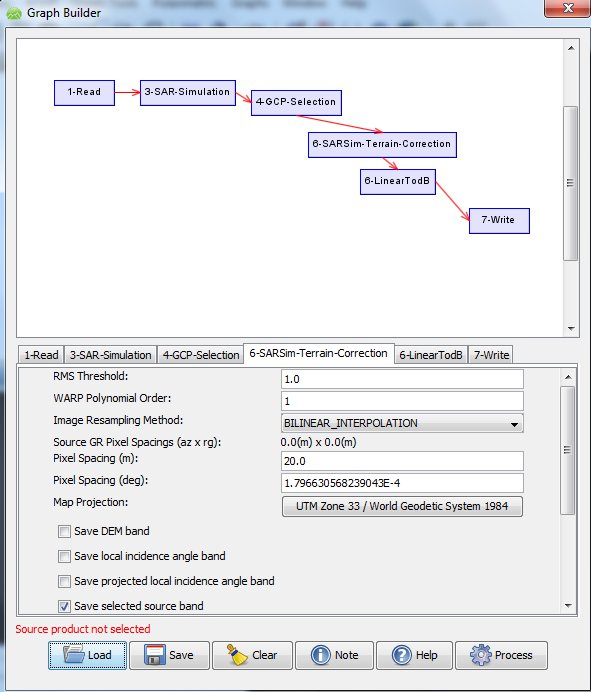
You set the values in Graph Builder and save it, lets say as "SARSIM_TC.xml". You still should check and edit the XML file for the parameters you need (map projection, resolution, etc) and you will have to modify the saved XML file at twoplaces for batch command line use as follows:
Make sure that the filenames in the XML file have $file and $target as placeholders as in the following examples:
for /r C:Usersmaxlocation_of_files %%X in (*.dim) do (gpt C:Usersmaxlocation_of_XMLfile SARSIM_TC.xml -Pfile="%%X" -Tfile=" C:Usersmaxlocation_of_files\%%~nX_SarSimTC.dim")
What happens here?
Read more »
Here is how to do it:
First you create the processing chain with the graph builder as described in part 2 and save it as an XML file. Especially in the beginning, you may want to keep it to simpler processing chains not containing all tasks at once. In our case, lets take only the SARSIM Terrain Correction:
You set the values in Graph Builder and save it, lets say as "SARSIM_TC.xml". You still should check and edit the XML file for the parameters you need (map projection, resolution, etc) and you will have to modify the saved XML file at twoplaces for batch command line use as follows:
Make sure that the filenames in the XML file have $file and $target as placeholders as in the following examples:
<node id="1-Read">and the Write part (sourceProduct refid may vary in your case):
<operator>Read</operator>
<sources/>
<parameters class="com.bc.ceres.binding.dom.Xpp3DomElement">
<file>$file</file>
</parameters>
</node>
<node id="2-Write">Now you create a SARSIM_TC.bat file containing
<operator>Write</operator>
<sources>
<sourceProduct refid="6-SARSim-Terrain-Correction"/>
</sources>
<parameters class="com.bc.ceres.binding.dom.Xpp3DomElement">
<formatName>BEAM-DIMAP</formatName>
<file>$target</file>
</parameters>
</node>
for /r C:Usersmaxlocation_of_files %%X in (*.dim) do (gpt C:Usersmaxlocation_of_XMLfile SARSIM_TC.xml -Pfile="%%X" -Tfile=" C:Usersmaxlocation_of_files\%%~nX_SarSimTC.dim")
What happens here?
- The for-command goes through the directory containing your files to find files named "*.dim" and passes the file name to "%%X".
- For each of these input files "-Pfile="%%X", the NEST command "gpt" applies the Graph Builder production chain saved in "SARSIMTC_dB.xml"
- The output is saved in the parameter -Tfile, which here is written "%%~nX_SarSimTC.dim", taking the filename and between original name and filetype adding "_SarSimTC" to indicate this is having been processed with SarSim. You may choose different naming, but I find this convenient.
You navigate the DOS window (type "cmd" at Windows Start> "search programs and files" to open it) to the directory containing SARSIM_TC.bat, then type "SARSIM_TC.bat" and all scenes in the specified folder will be processed.
The results will be the same as shown in Part 1
Tuesday, February 10, 2015
Terrain Correction of SAR Images Part 1
A characteristic of side-looking SAR image is the so-called foreshortening and layover, a reflected signal from a mountaintop reaches the sensor earlier or at the same time as the signal at the foot of the mountain. This results in the typical look of mountains that seem to have "fallen over" towards the sensor:


A problem in the current version: If you -- after having processed a particular scene -- choose a different scene under "1-Read" as input having differently named source bands, the source band list under "3-SAR Simulation" does not update -- you have to close the whole window and start all over -- part 2 and following describe how to process a large number of scenes.
The next postings will discuss how to run all this from command line and do batch processing.
Read more »
In the original image to the left, a pixel is basically displaced depending on its elevation above sea-level, so it is important to remove this layover as seen in the image above to the right. The freely available NEST SAR Toolbox is in many ways a great tool for satellite image processing and makes it very easy terrain-correct SAR images in a fully automatic process.
The algorithm takes the DEM and using orbit parameters of the satellite creates a simulated SAR image from this DEM. The simulated and the real SAR image, which will look very similiar, are coregistered. Through this simulation, the displacement for each location in the original landscape, the DEM, is known, so if the simulated SAR image is transformed back into the original DEM -- and the coregistered SAR image along with it -- the pixels of the SAR image will receive their real, geographical location. (Its actually quite easy in principle, but not sure this description is clear...)
Below is the original ESA SAR image as loaded into NEST displaying the typical layover:
Before the terrain correction, I apply the newest orbit file (Utilities>Apply Orbit), calibrate the values (SAR Tools>Radiometric Correction>Calibrate; but not in dB since the terrain correction needs linear values!) and the run a speckle filter, median 3x3 (SAR Tools>Speckle Filtering>Single Image)
Now to the actual terrain correction. Choose Geometry>Terrain Correction>SAR Simulation Terrain Correction. In the first tab 1-Read you choose the product to be corrected:
The second tab defines the output. Unfortunately the default output filename in this case is only "SarSimTC.dim", I follow the NEST naming convention where all methods applied are contained in the filename, such as "ORIGINALNAME_AppOrb_Calib_Spk_SarSimTC.dim" but this has to be typed manually:
In the "3-SAR simulation" tab, one can choose various DEM such as GETASSE and SRTM, but in my case I choose an "External DEM" and specify the file path. I set the "no data value" to 9999.0, otherwise all ocean surface will be NAN. There is something unusual in this tab -- if you do not highlight any of the source bands, the first one only will be processed, in this case "Amplitude_VV". If other bands also should be processed, both source bands (in this case Amplitude_VV and Amplitude_VH) must be highlighted by choosing and clicking them!
The "4-GCP Selection" tab I leave the given values:
Finally, the "5-SARSIM-Terrain-Correction" tab. For my purpose, I choose 20m resolution for the output image, the map projection of Svalbard/Spitsbergen WGS1984 / UTM 33N and prefer nearest neighbour interpolation:
Now I can choose "process" and this particular run takes 6.5 minutes on a Windows 7 64-bit computer for one source band. For two source bands it is much, much longer (80 minutes in this run!) and may not work if the computer has too little RAM, so the best and fast way is to process individual source bands separately. (The Range Doppler algorithm for removing layover which I will discuss in a later is faster but does not work for some scenes at high latitudes(?)).
I choose "Utilities>Dataset Conversion>Linear to dB" to get desibel values and get this final result. The data fits perfectly to cartographic shapefiles of the coastlines and to the other geolocations.

I choose "Utilities>Dataset Conversion>Linear to dB" to get desibel values and get this final result. The data fits perfectly to cartographic shapefiles of the coastlines and to the other geolocations.
compared again to the original SAR image the difference is easily visible!
A problem in the current version: If you -- after having processed a particular scene -- choose a different scene under "1-Read" as input having differently named source bands, the source band list under "3-SAR Simulation" does not update -- you have to close the whole window and start all over -- part 2 and following describe how to process a large number of scenes.
The next postings will discuss how to run all this from command line and do batch processing.
Subscribe to:
Posts (Atom)