Wednesday, February 18, 2015
Terrain Correction of SAR Images Part 3
Here is how to do it:
First you create the processing chain with the graph builder as described in part 2 and save it as an XML file. Especially in the beginning, you may want to keep it to simpler processing chains not containing all tasks at once. In our case, lets take only the SARSIM Terrain Correction:
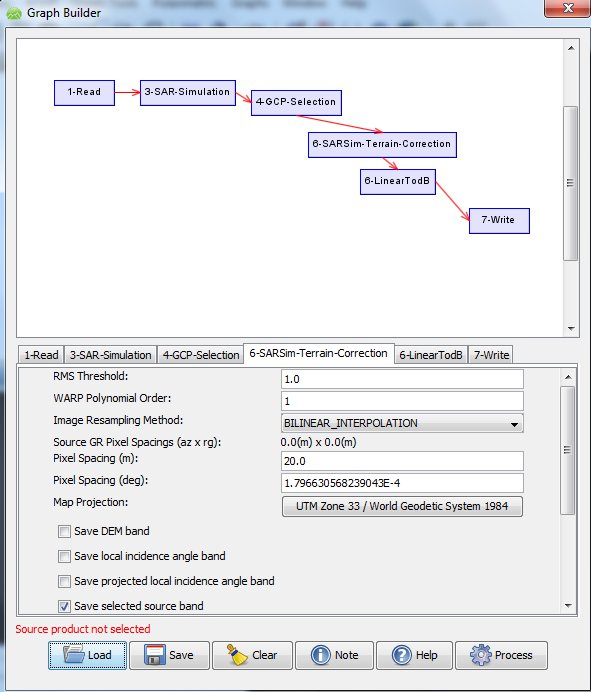
You set the values in Graph Builder and save it, lets say as "SARSIM_TC.xml". You still should check and edit the XML file for the parameters you need (map projection, resolution, etc) and you will have to modify the saved XML file at twoplaces for batch command line use as follows:
Make sure that the filenames in the XML file have $file and $target as placeholders as in the following examples:
<node id="1-Read">and the Write part (sourceProduct refid may vary in your case):
<operator>Read</operator>
<sources/>
<parameters class="com.bc.ceres.binding.dom.Xpp3DomElement">
<file>$file</file>
</parameters>
</node>
<node id="2-Write">Now you create a SARSIM_TC.bat file containing
<operator>Write</operator>
<sources>
<sourceProduct refid="6-SARSim-Terrain-Correction"/>
</sources>
<parameters class="com.bc.ceres.binding.dom.Xpp3DomElement">
<formatName>BEAM-DIMAP</formatName>
<file>$target</file>
</parameters>
</node>
for /r C:Usersmaxlocation_of_files %%X in (*.dim) do (gpt C:Usersmaxlocation_of_XMLfile SARSIM_TC.xml -Pfile="%%X" -Tfile=" C:Usersmaxlocation_of_files\%%~nX_SarSimTC.dim")
What happens here?
- The for-command goes through the directory containing your files to find files named "*.dim" and passes the file name to "%%X".
- For each of these input files "-Pfile="%%X", the NEST command "gpt" applies the Graph Builder production chain saved in "SARSIMTC_dB.xml"
- The output is saved in the parameter -Tfile, which here is written "%%~nX_SarSimTC.dim", taking the filename and between original name and filetype adding "_SarSimTC" to indicate this is having been processed with SarSim. You may choose different naming, but I find this convenient.
You navigate the DOS window (type "cmd" at Windows Start> "search programs and files" to open it) to the directory containing SARSIM_TC.bat, then type "SARSIM_TC.bat" and all scenes in the specified folder will be processed.
The results will be the same as shown in Part 1
Subscribe to:
Post Comments (Atom)
No comments:
Post a Comment
Note: Only a member of this blog may post a comment.